CARF Diablo build thread
 09-01-2023, 07:15 AM
#1

Thread Starter
When CARF released the Mephisto in 2017 immediately there were people who said, I would like one...but it’s too big!
The conversation started within CARF's inner circle, but the big boss felt the layout of the Mephisto would not directly scale because the wings were already relatively high aspect ratio. My simple answer to increase the cord ratio was poo-pooed because it changes other things like the wing section...but the Mephisto proved a huge success and the design costs were met, plus CARF Team Pilots now included some very talented CAD drivers, so the 'young guns' started looking at the problem and in early 2023 Mephisto's baby was born. It could not have worked out better!
The three-part wing and two-part fuselage are not needed and the Diablo transport works out really nicely even in a standard type estate/station wagon car. If you go with the vector option a 200-220N turbine will hover it nicely...do not even think about fitting a 250 unless you fly at extreme altitude, it just does not need it. Because not everyone wants to hover or flip, CARF have a straight pipe option where a turbine 140-160 will power it well-I have a few customers already thinking of the JetCat P-130Rx-B because of its size and weight and actual 150N+ thrust.
There have been two prototypes seen flying in Europe and the USA before production started, both with KT 210 turbines. I was lucky to receive one of the first kits produced in July at the same time Marius from CARF received his own red colour swap kit. Both our builds helped 'de bug' the next production run. If you have a kit now, it’s likely to match my build closely.
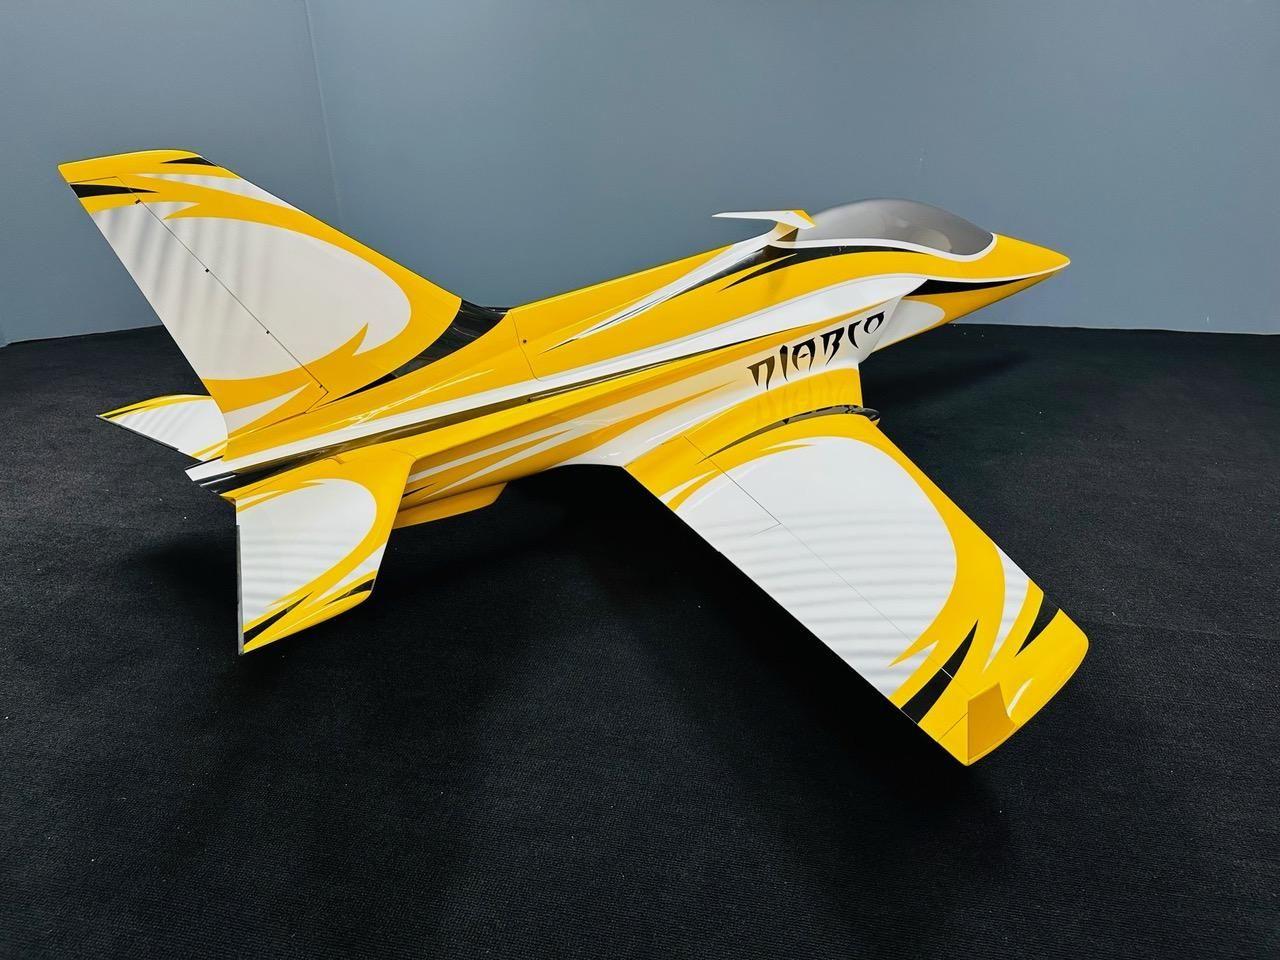
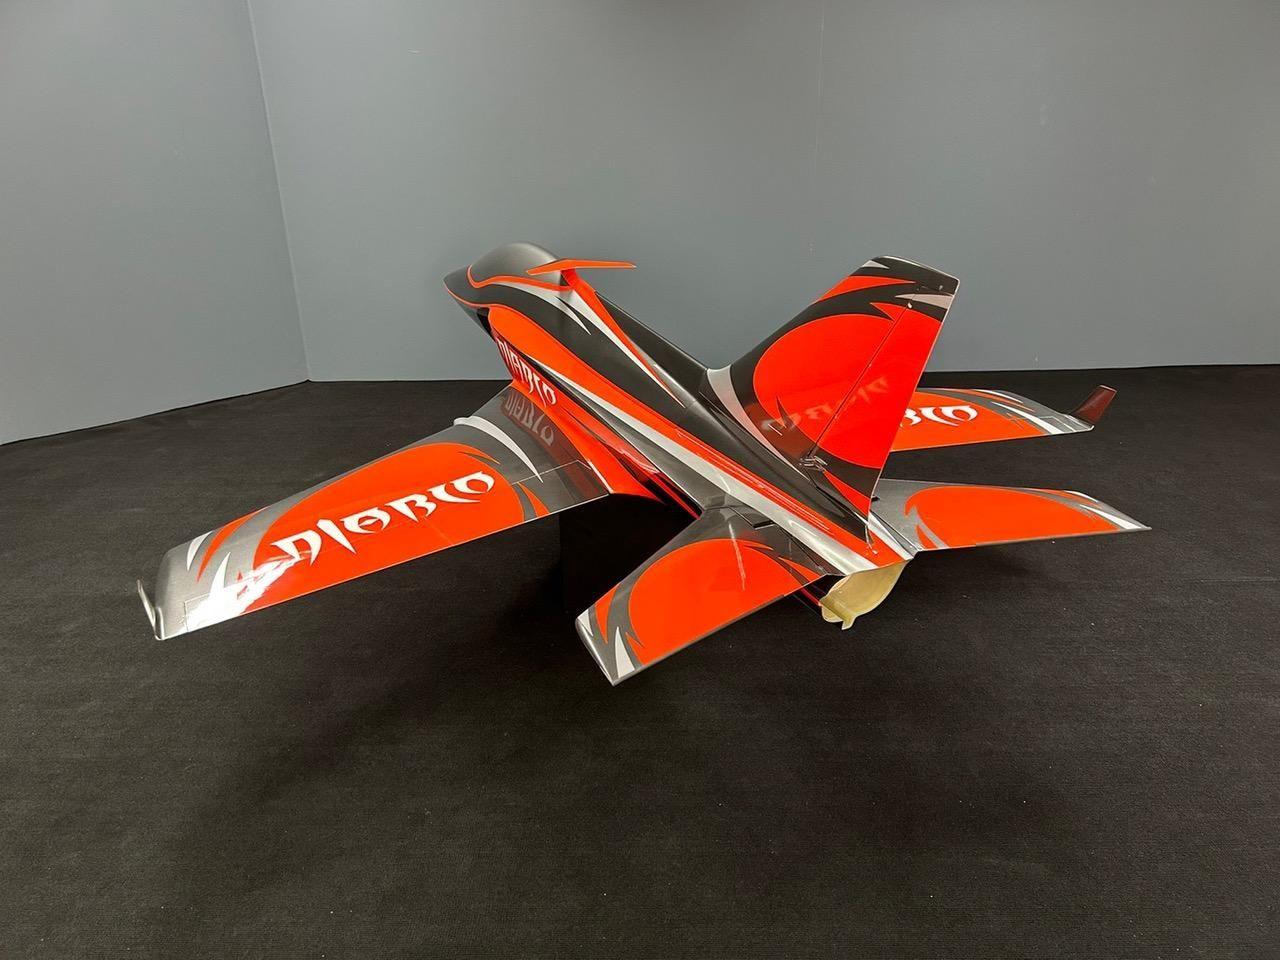
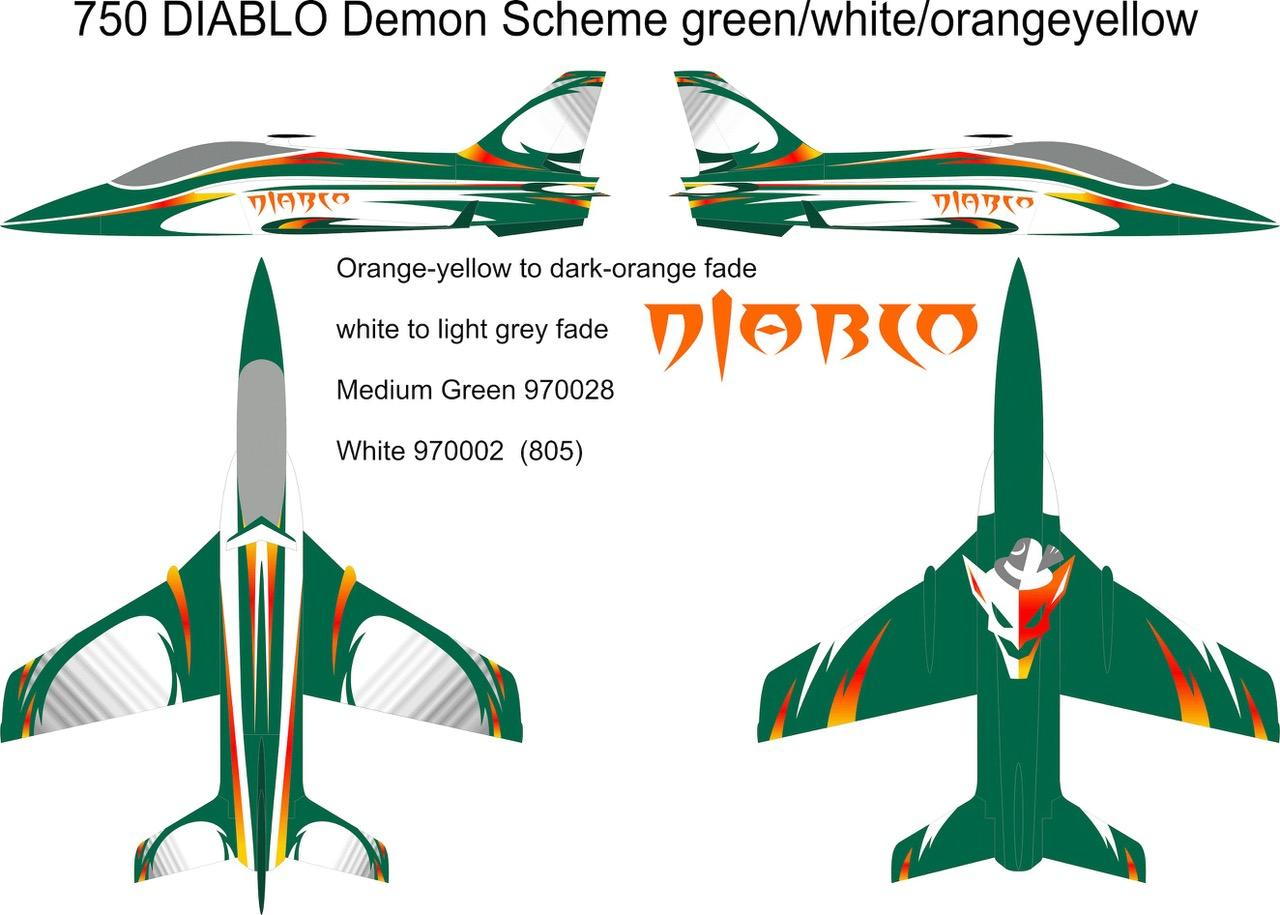
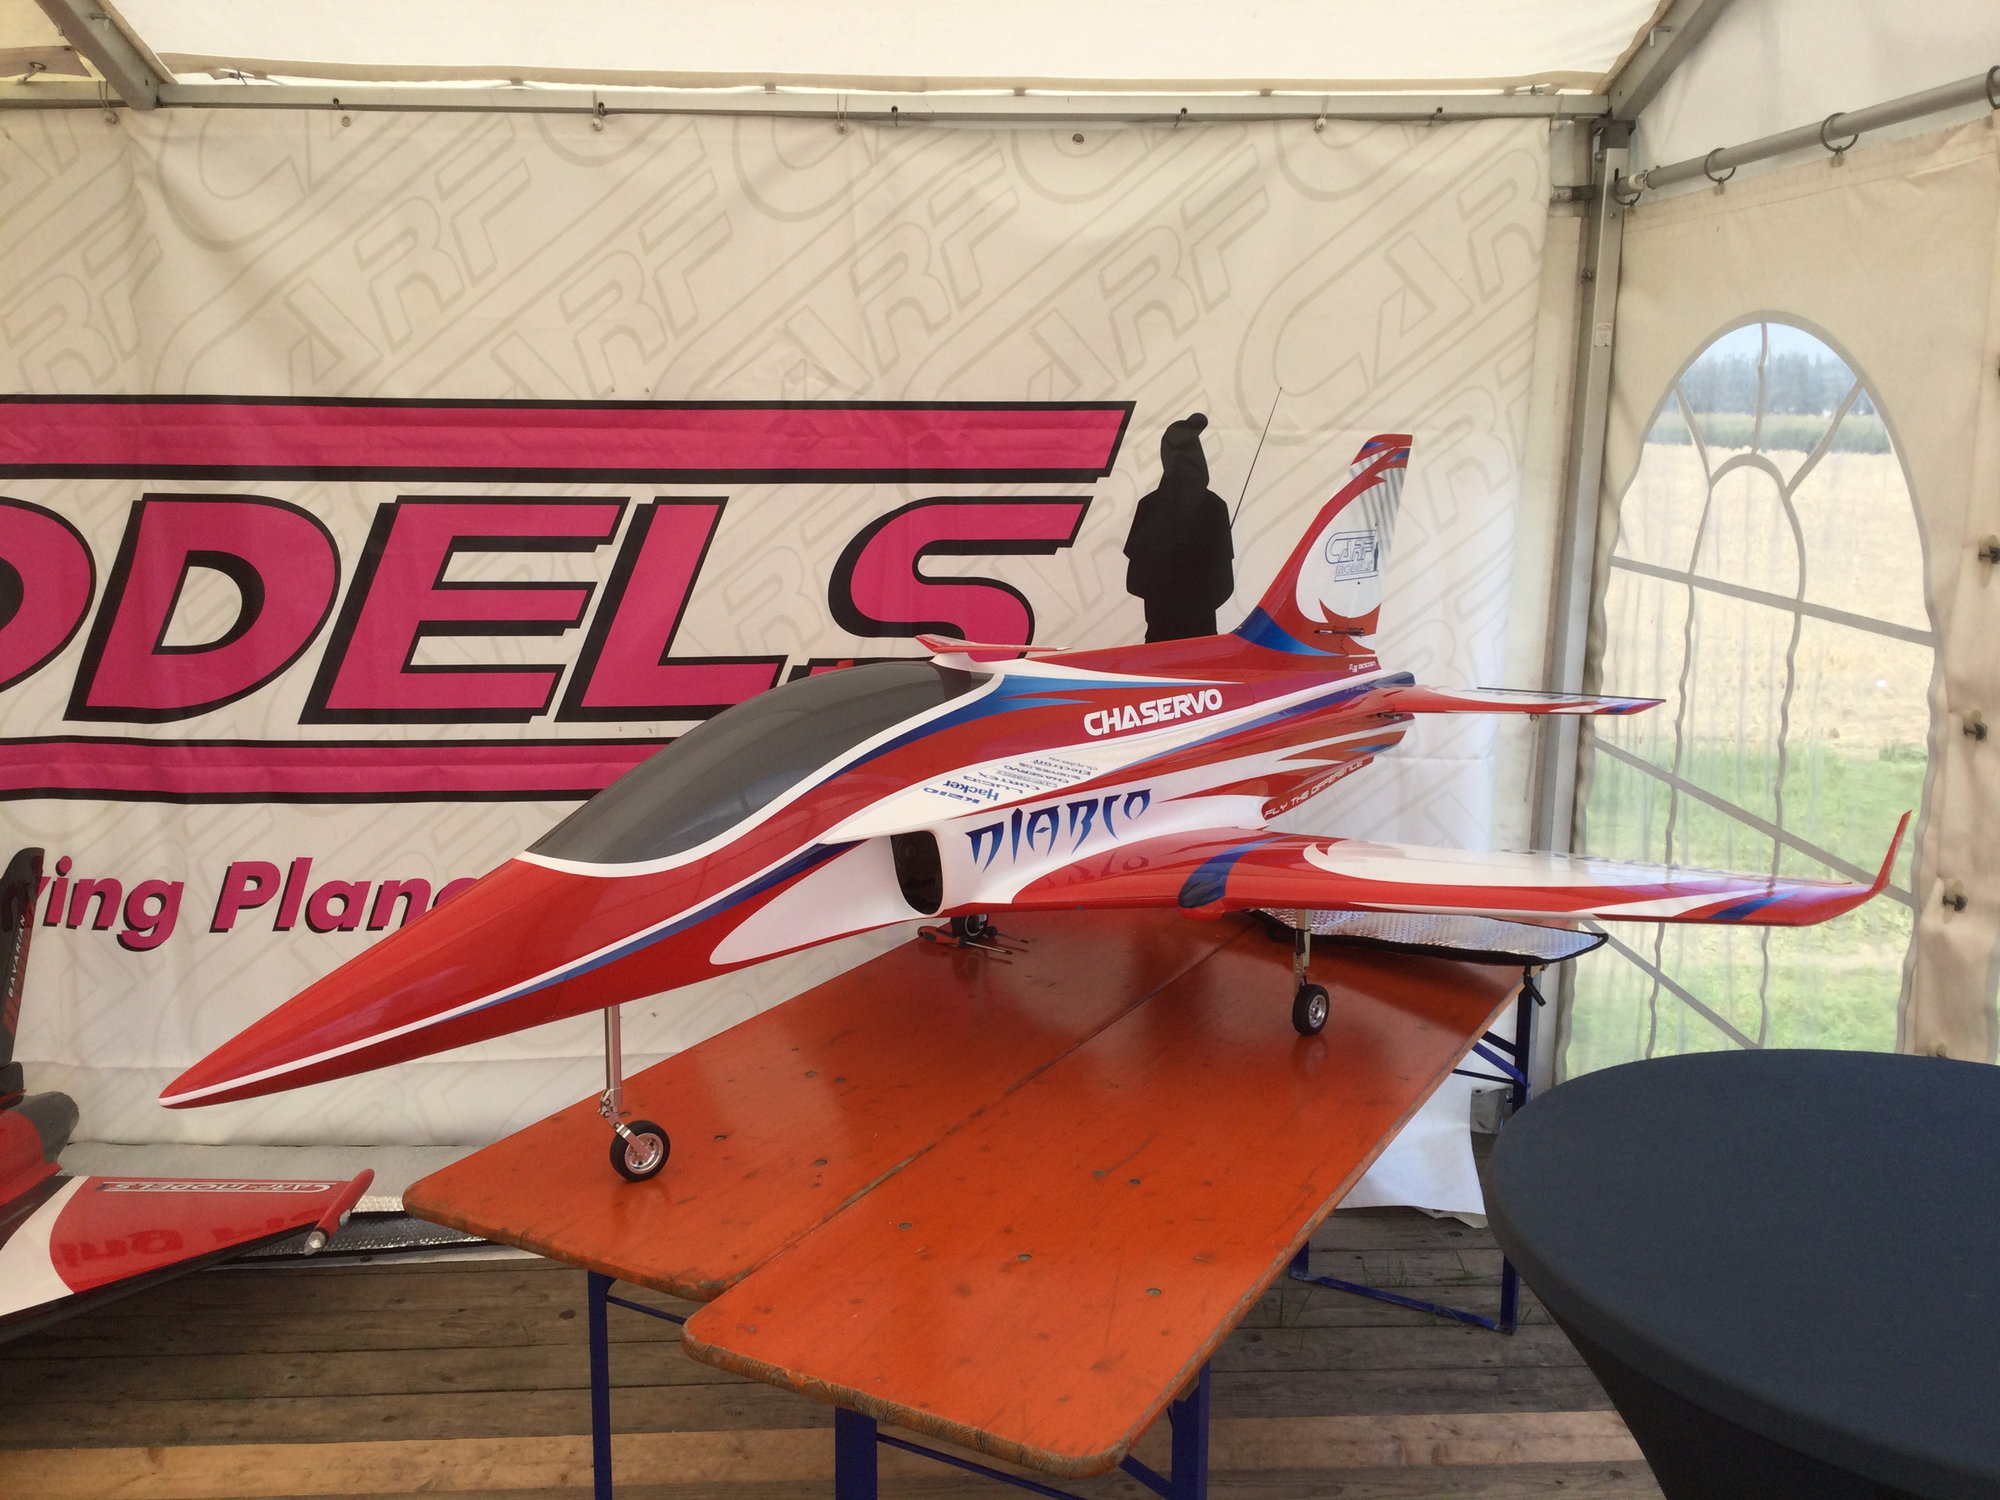
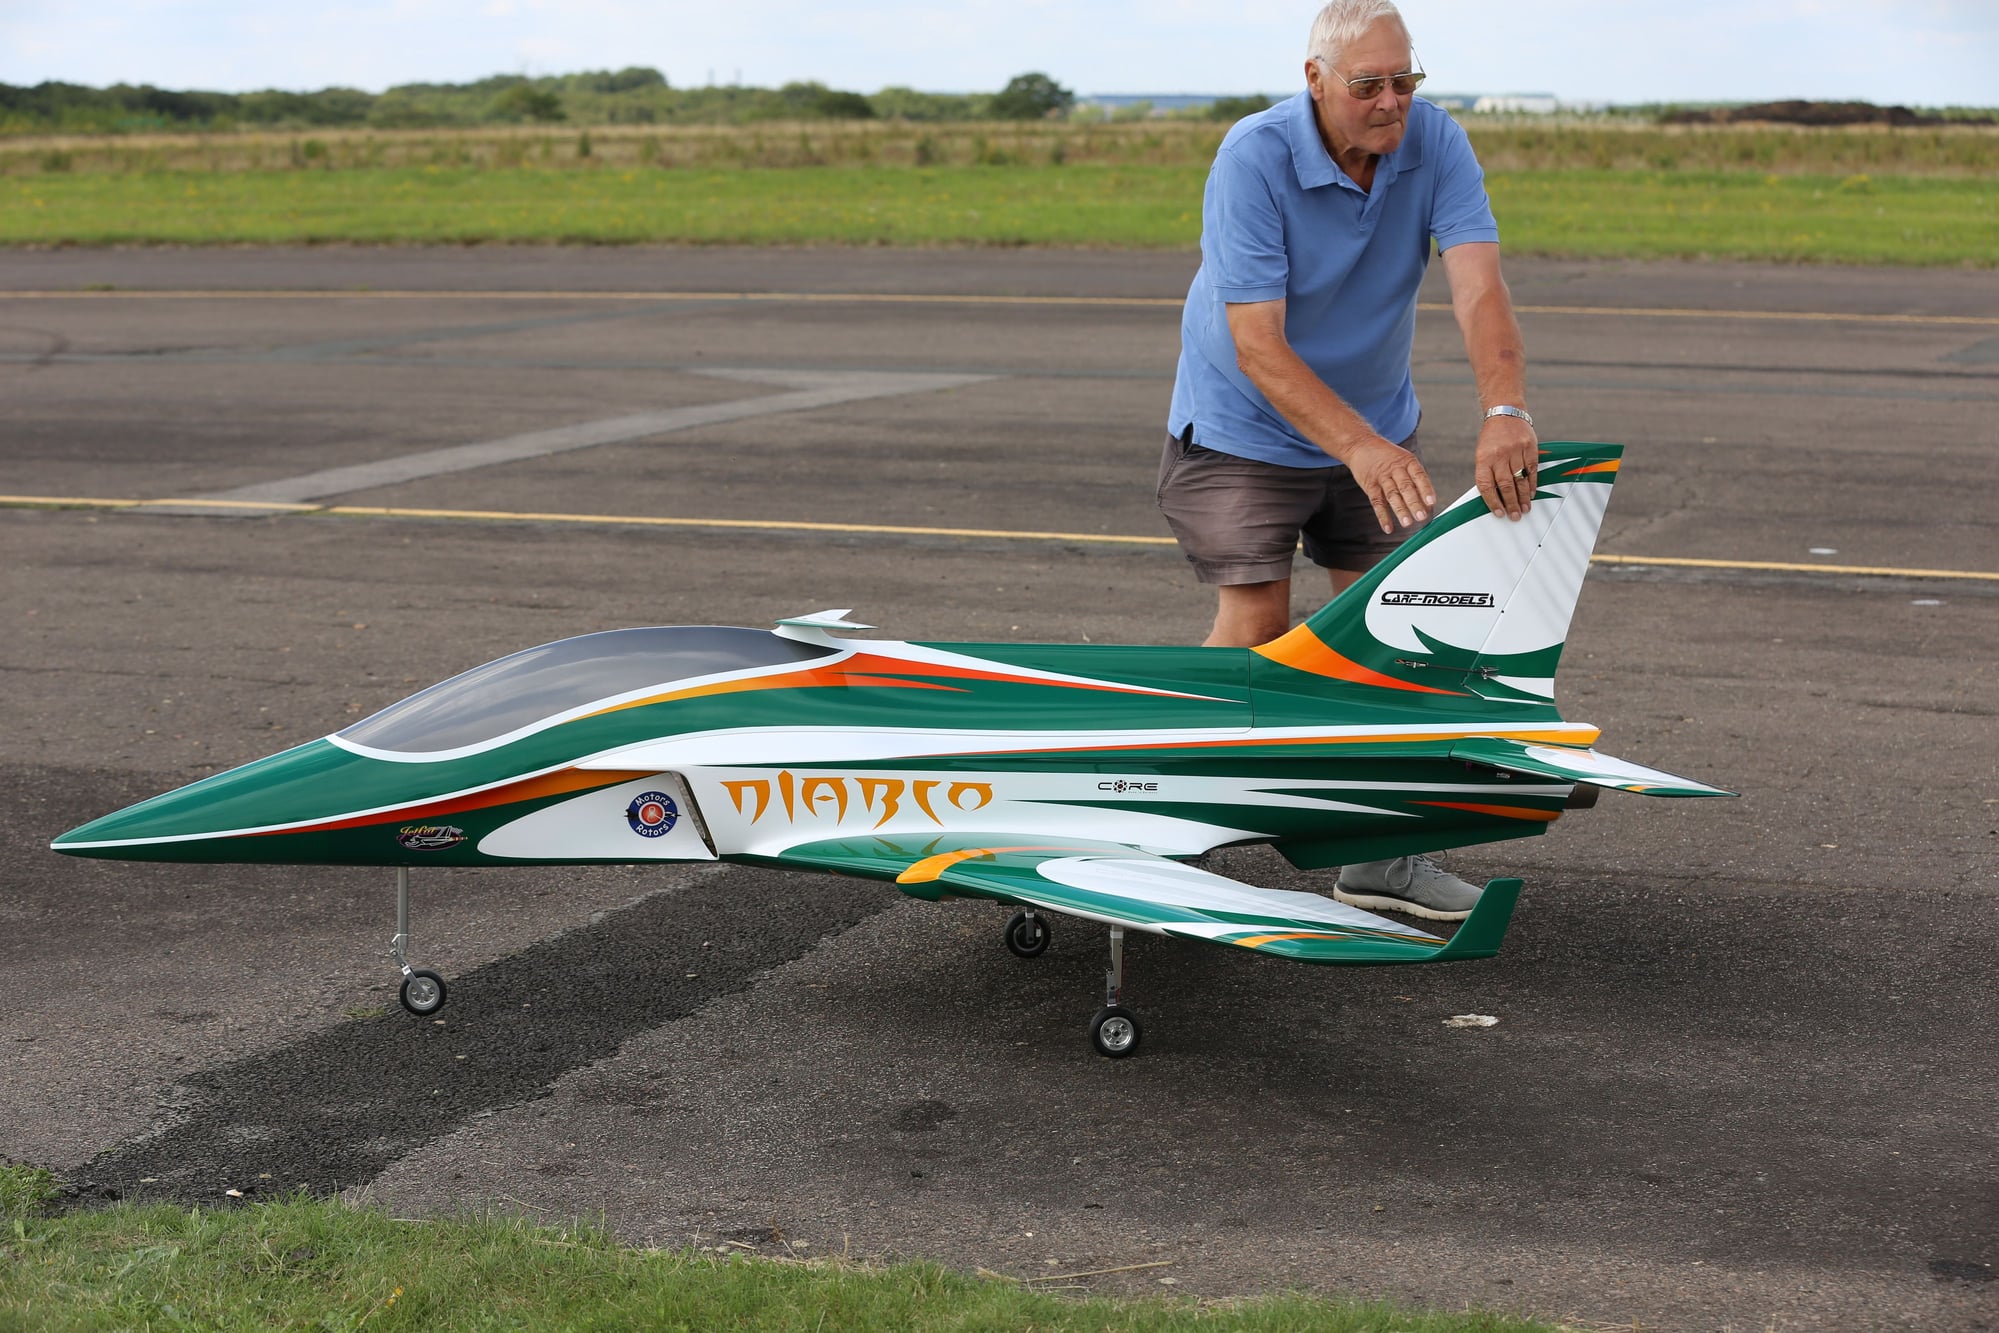
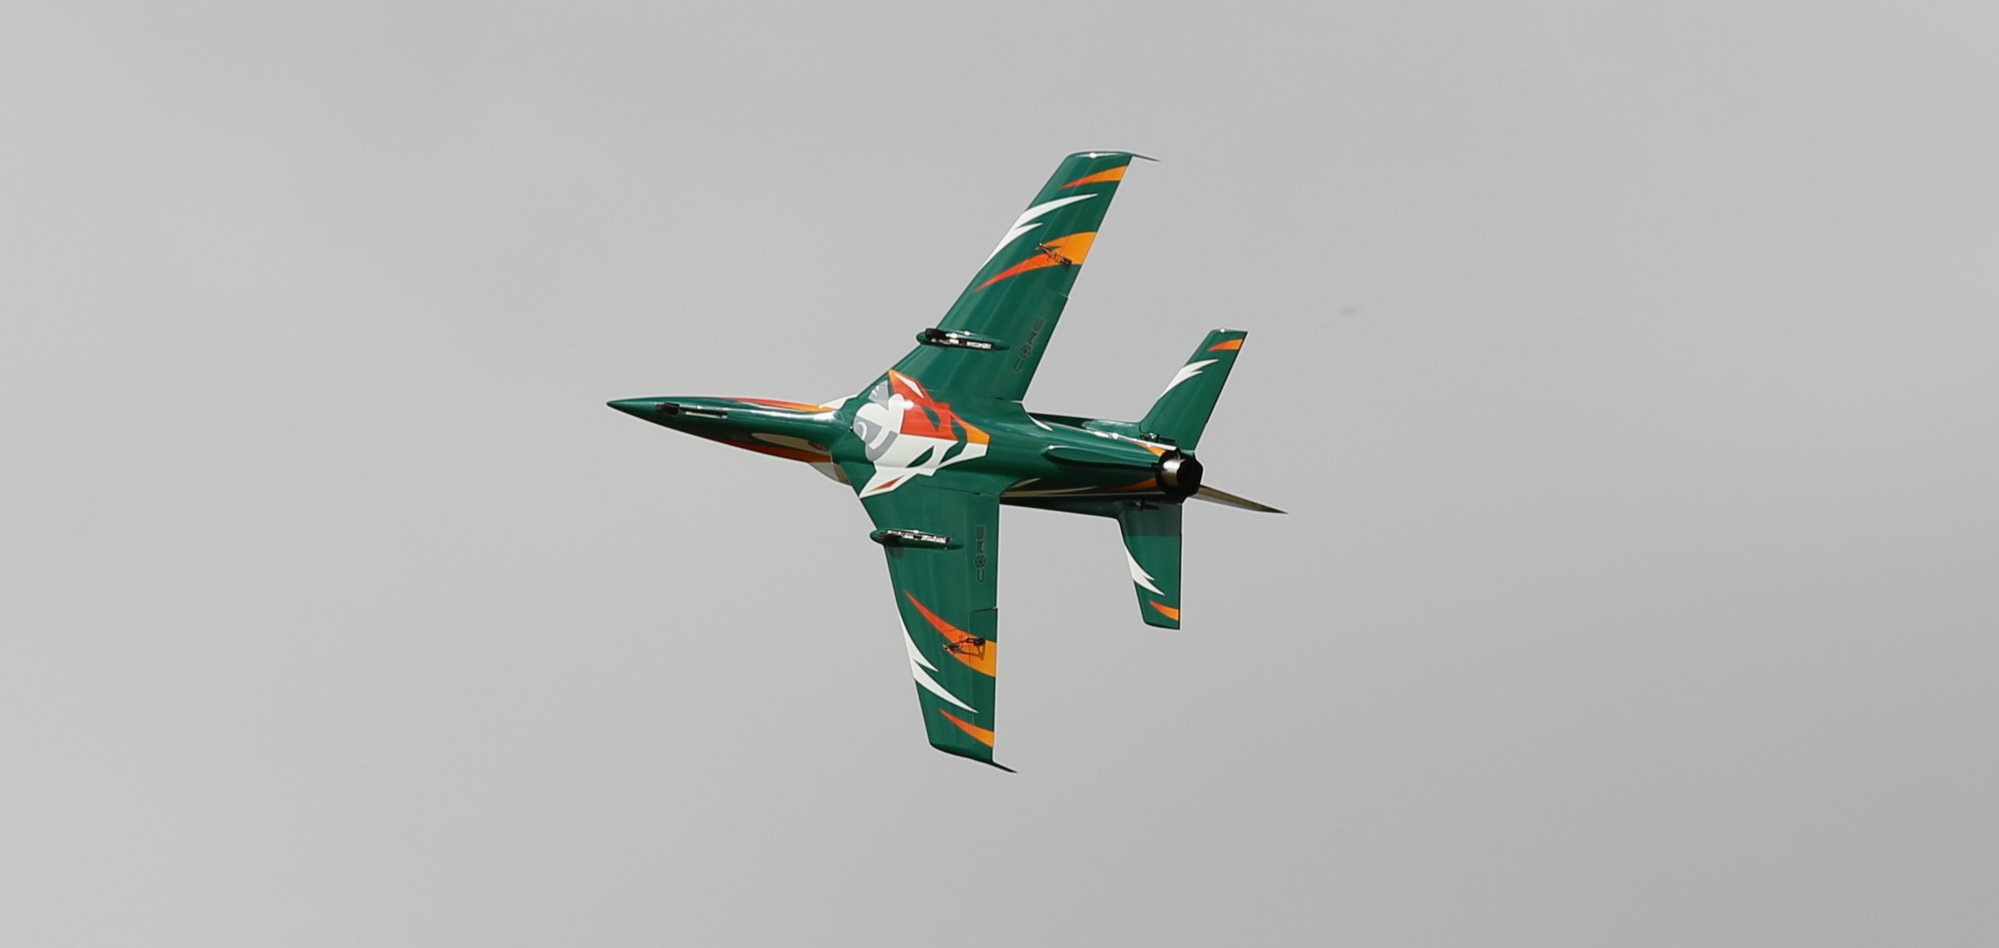
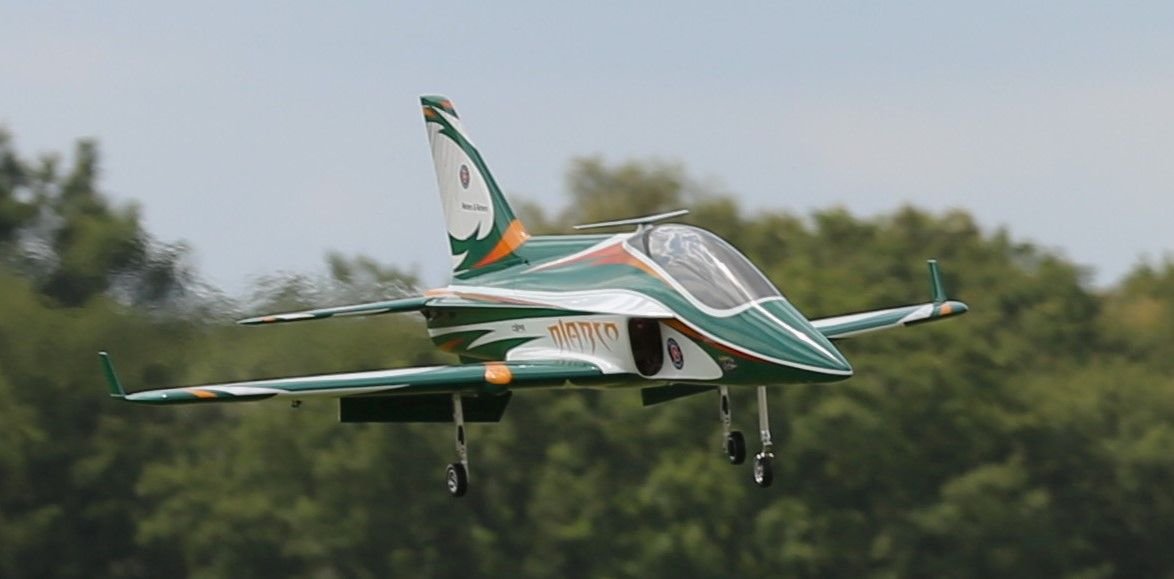
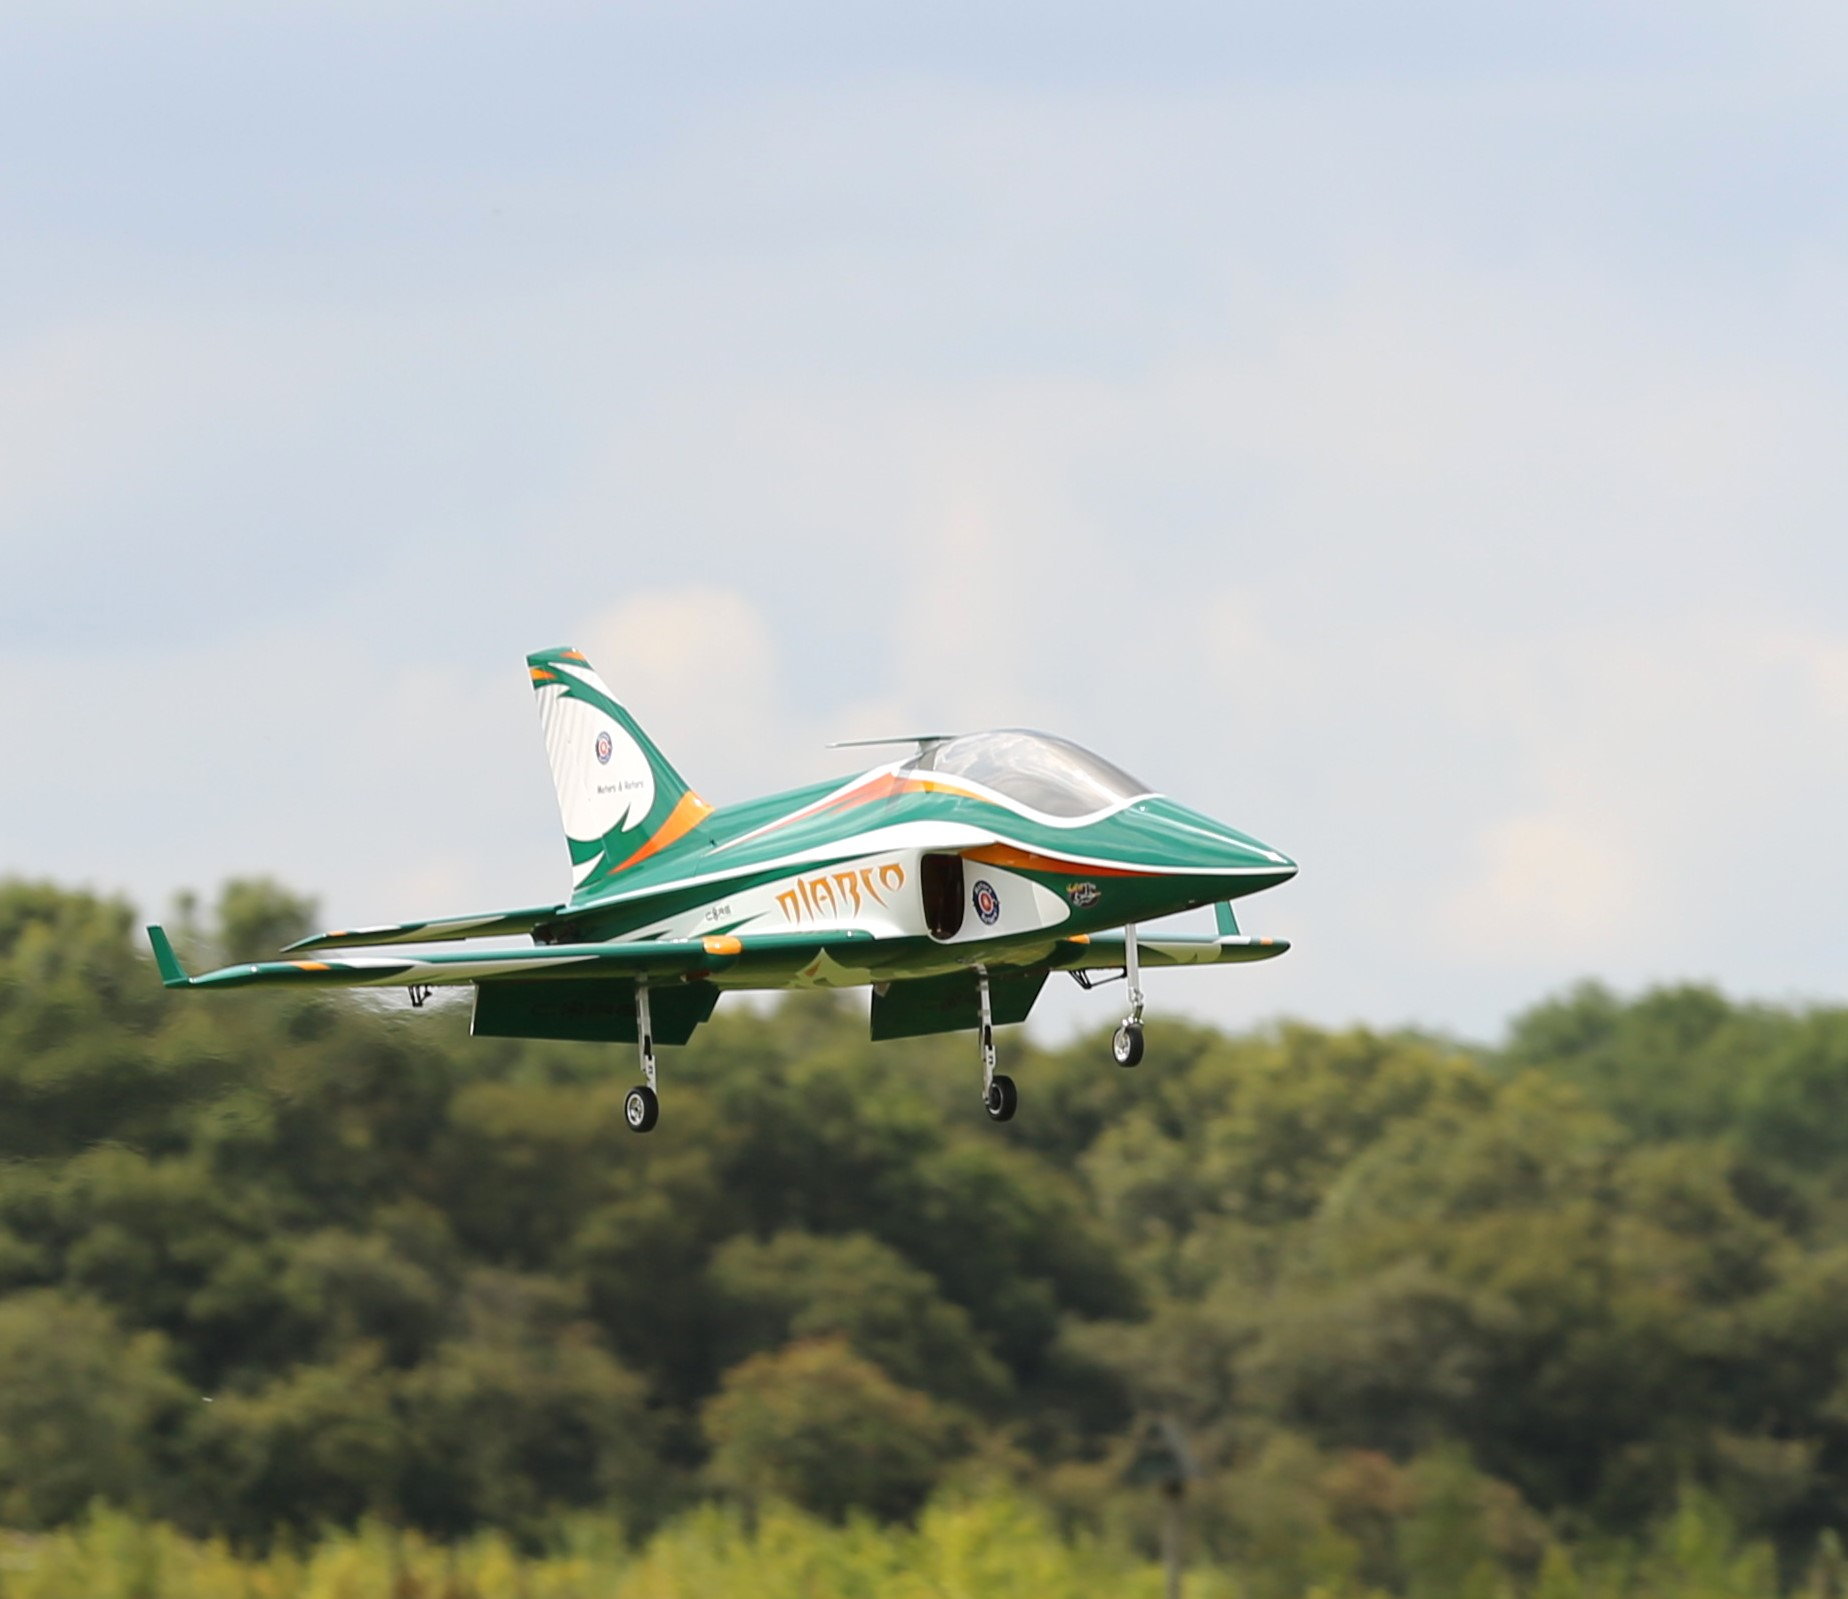
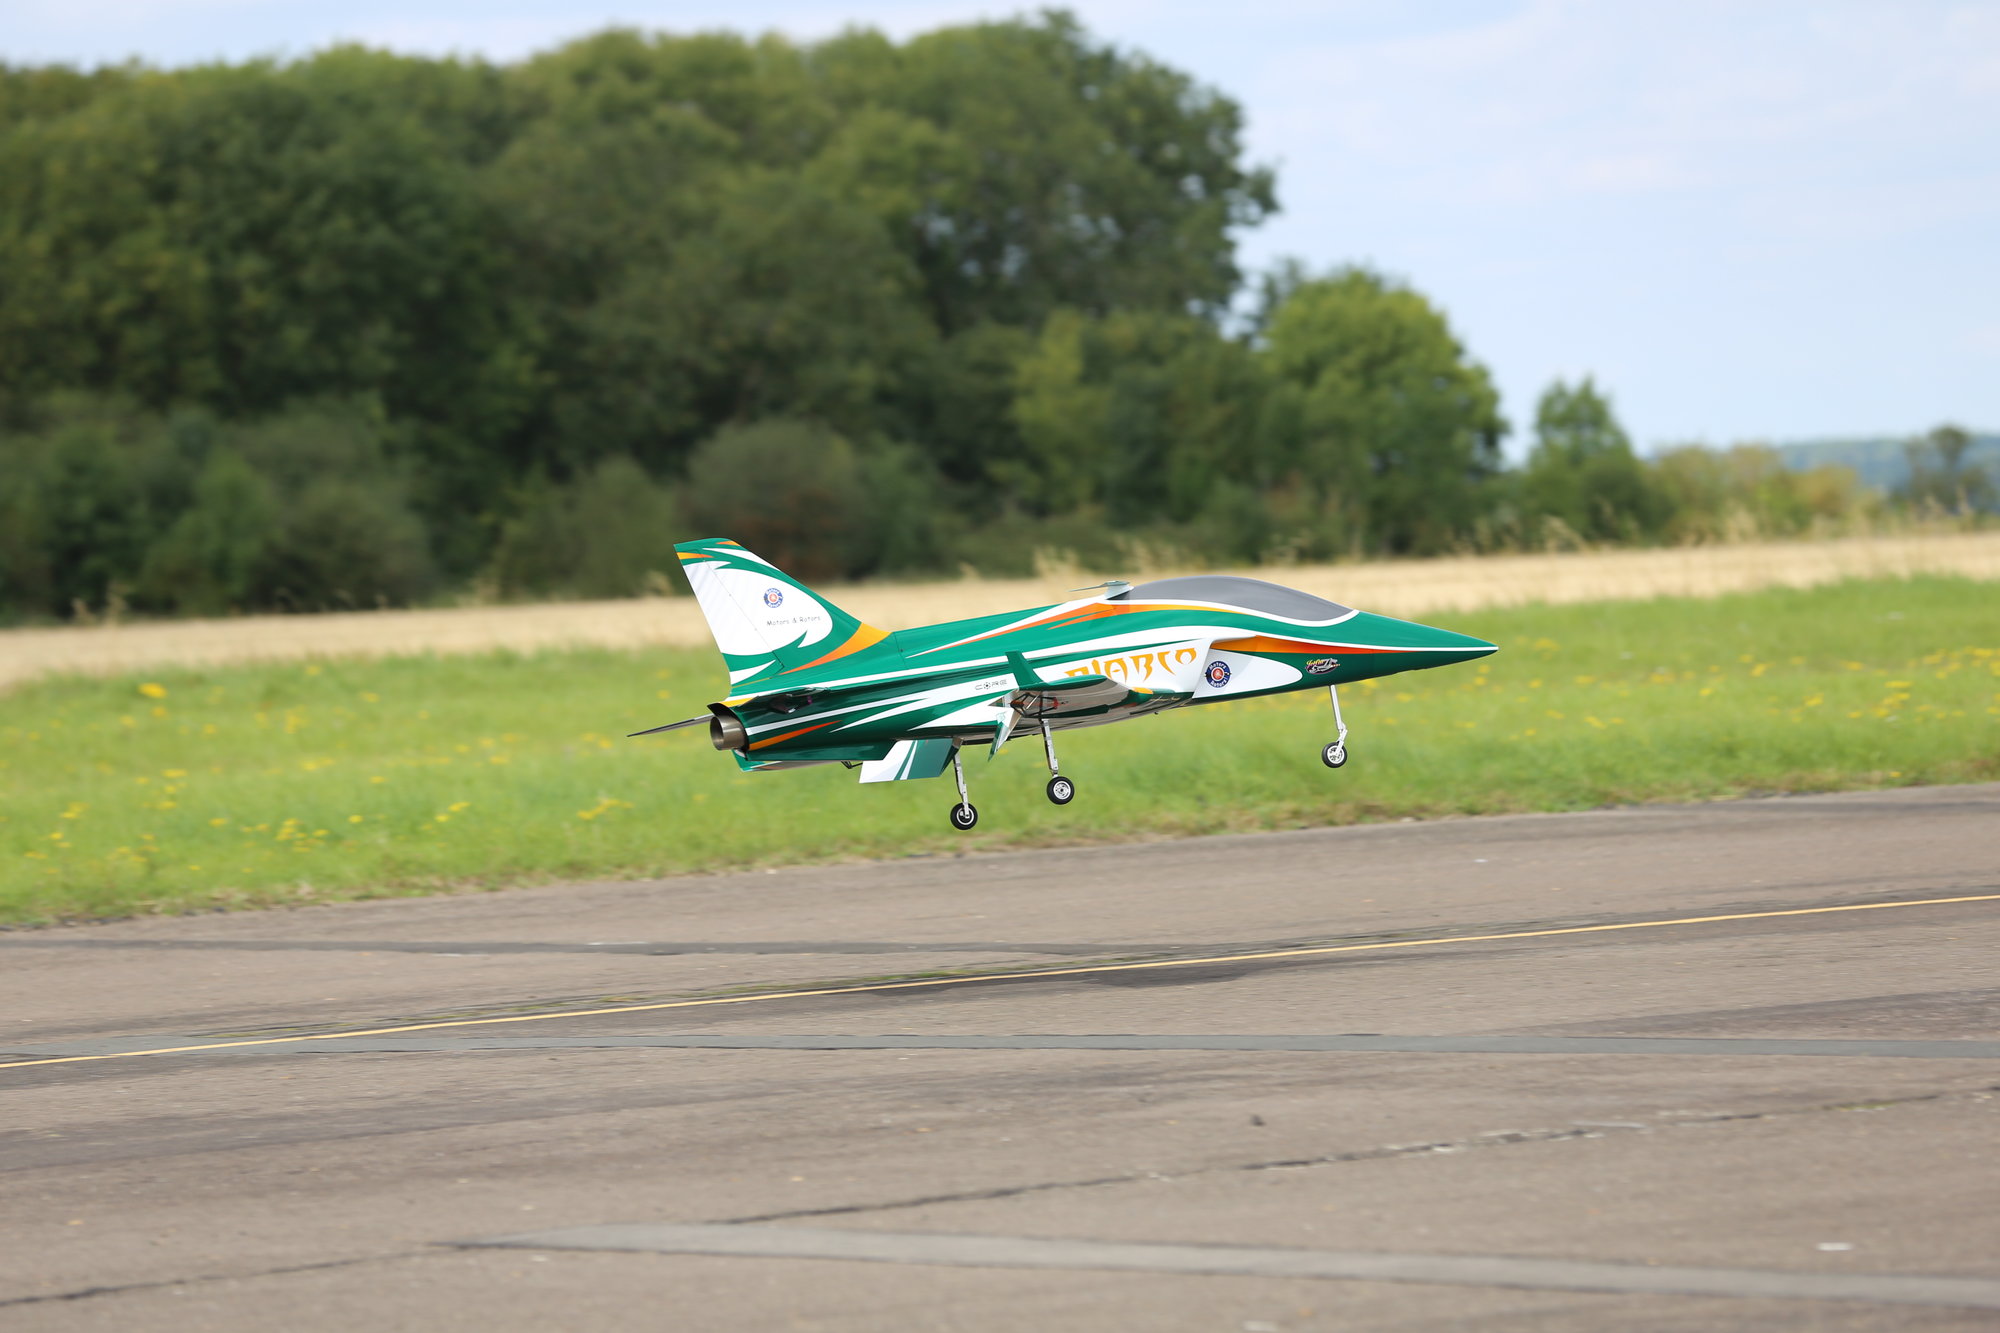
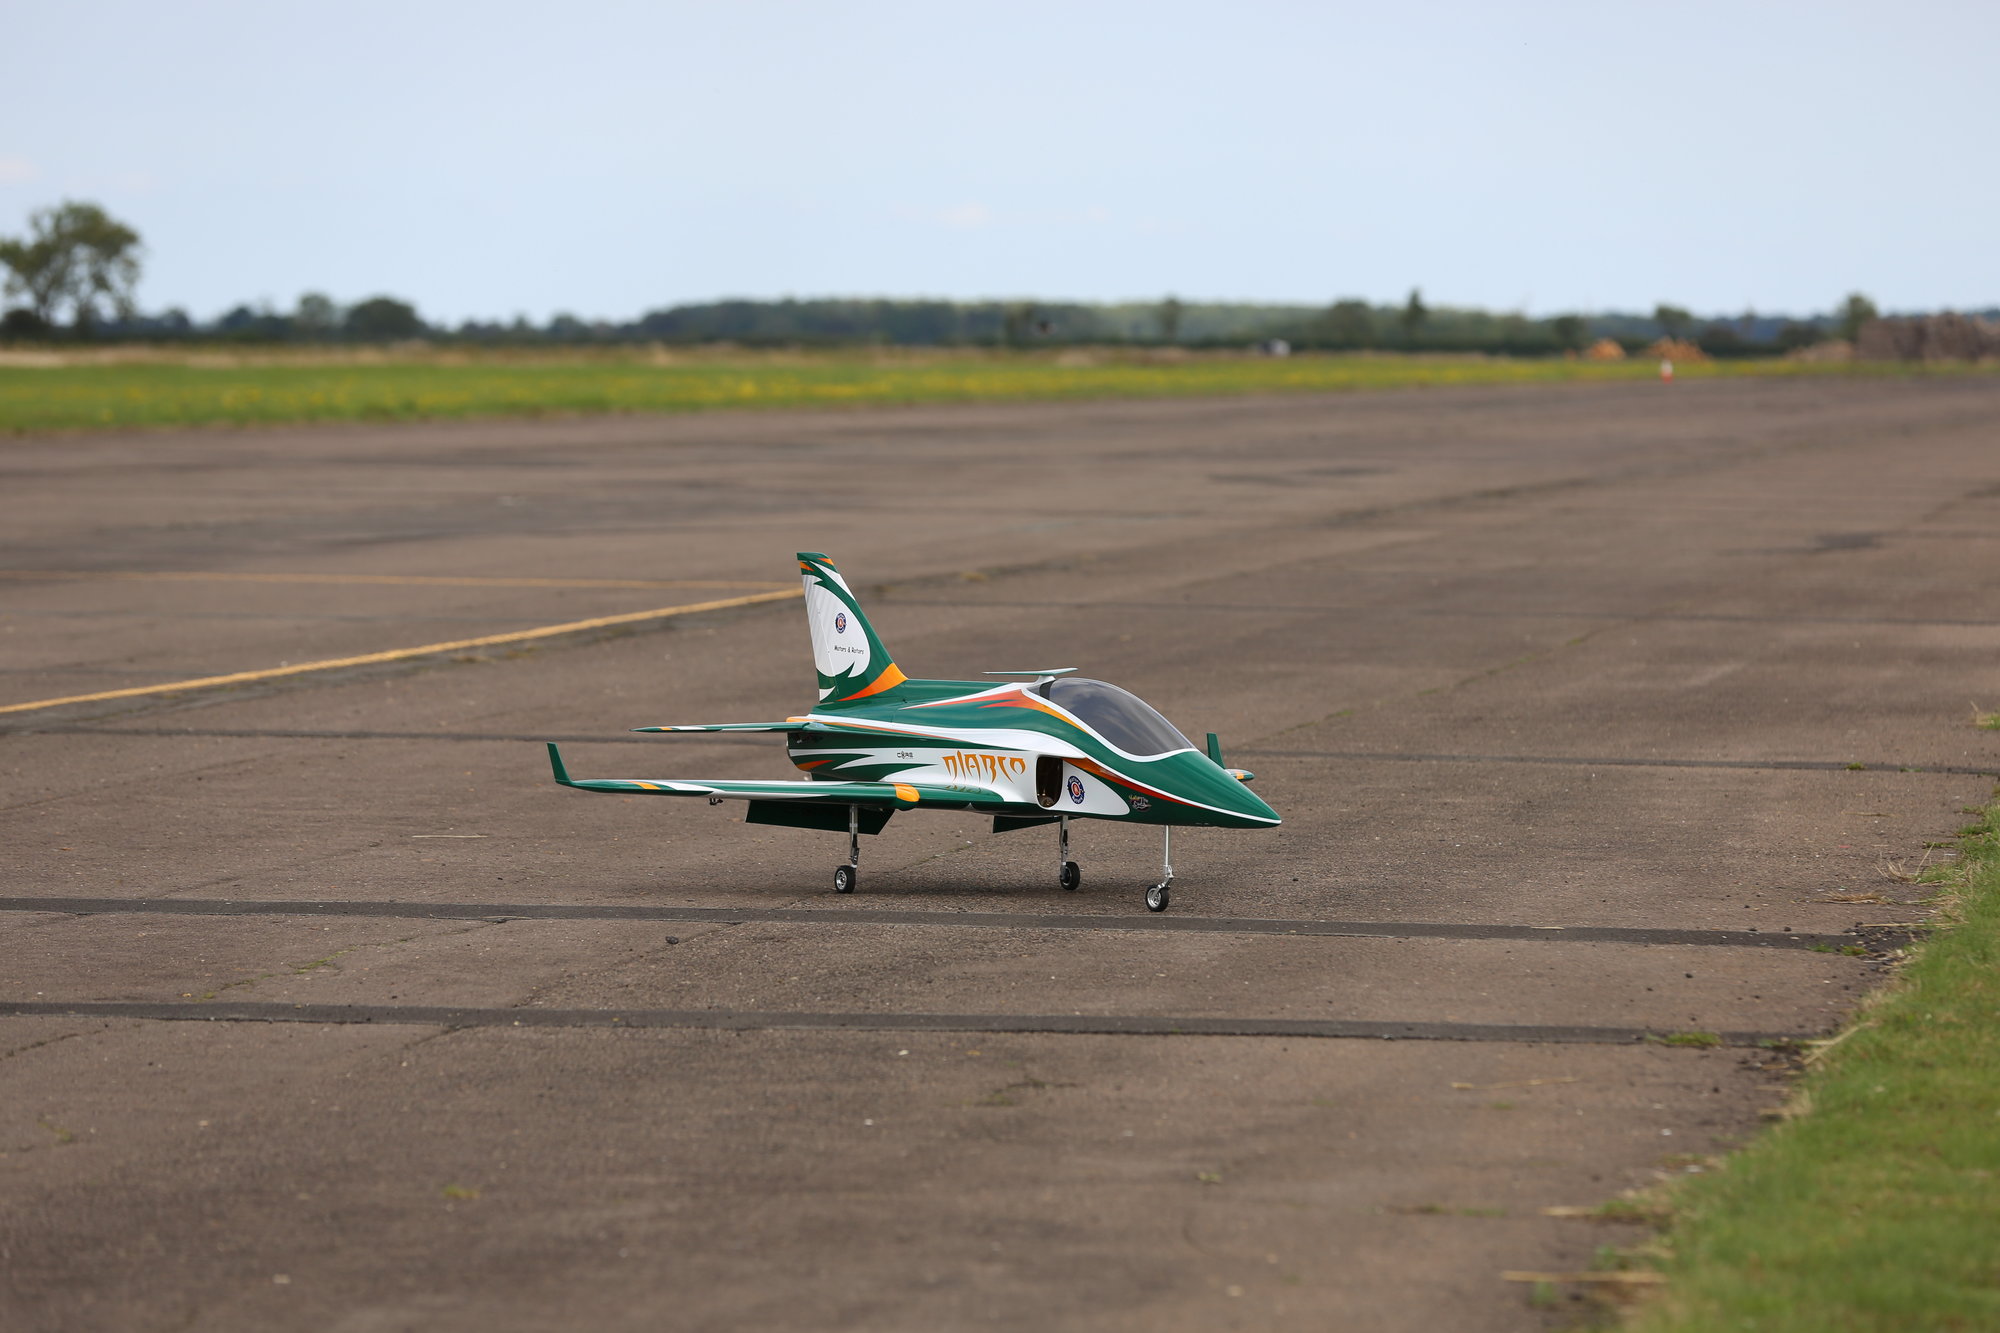
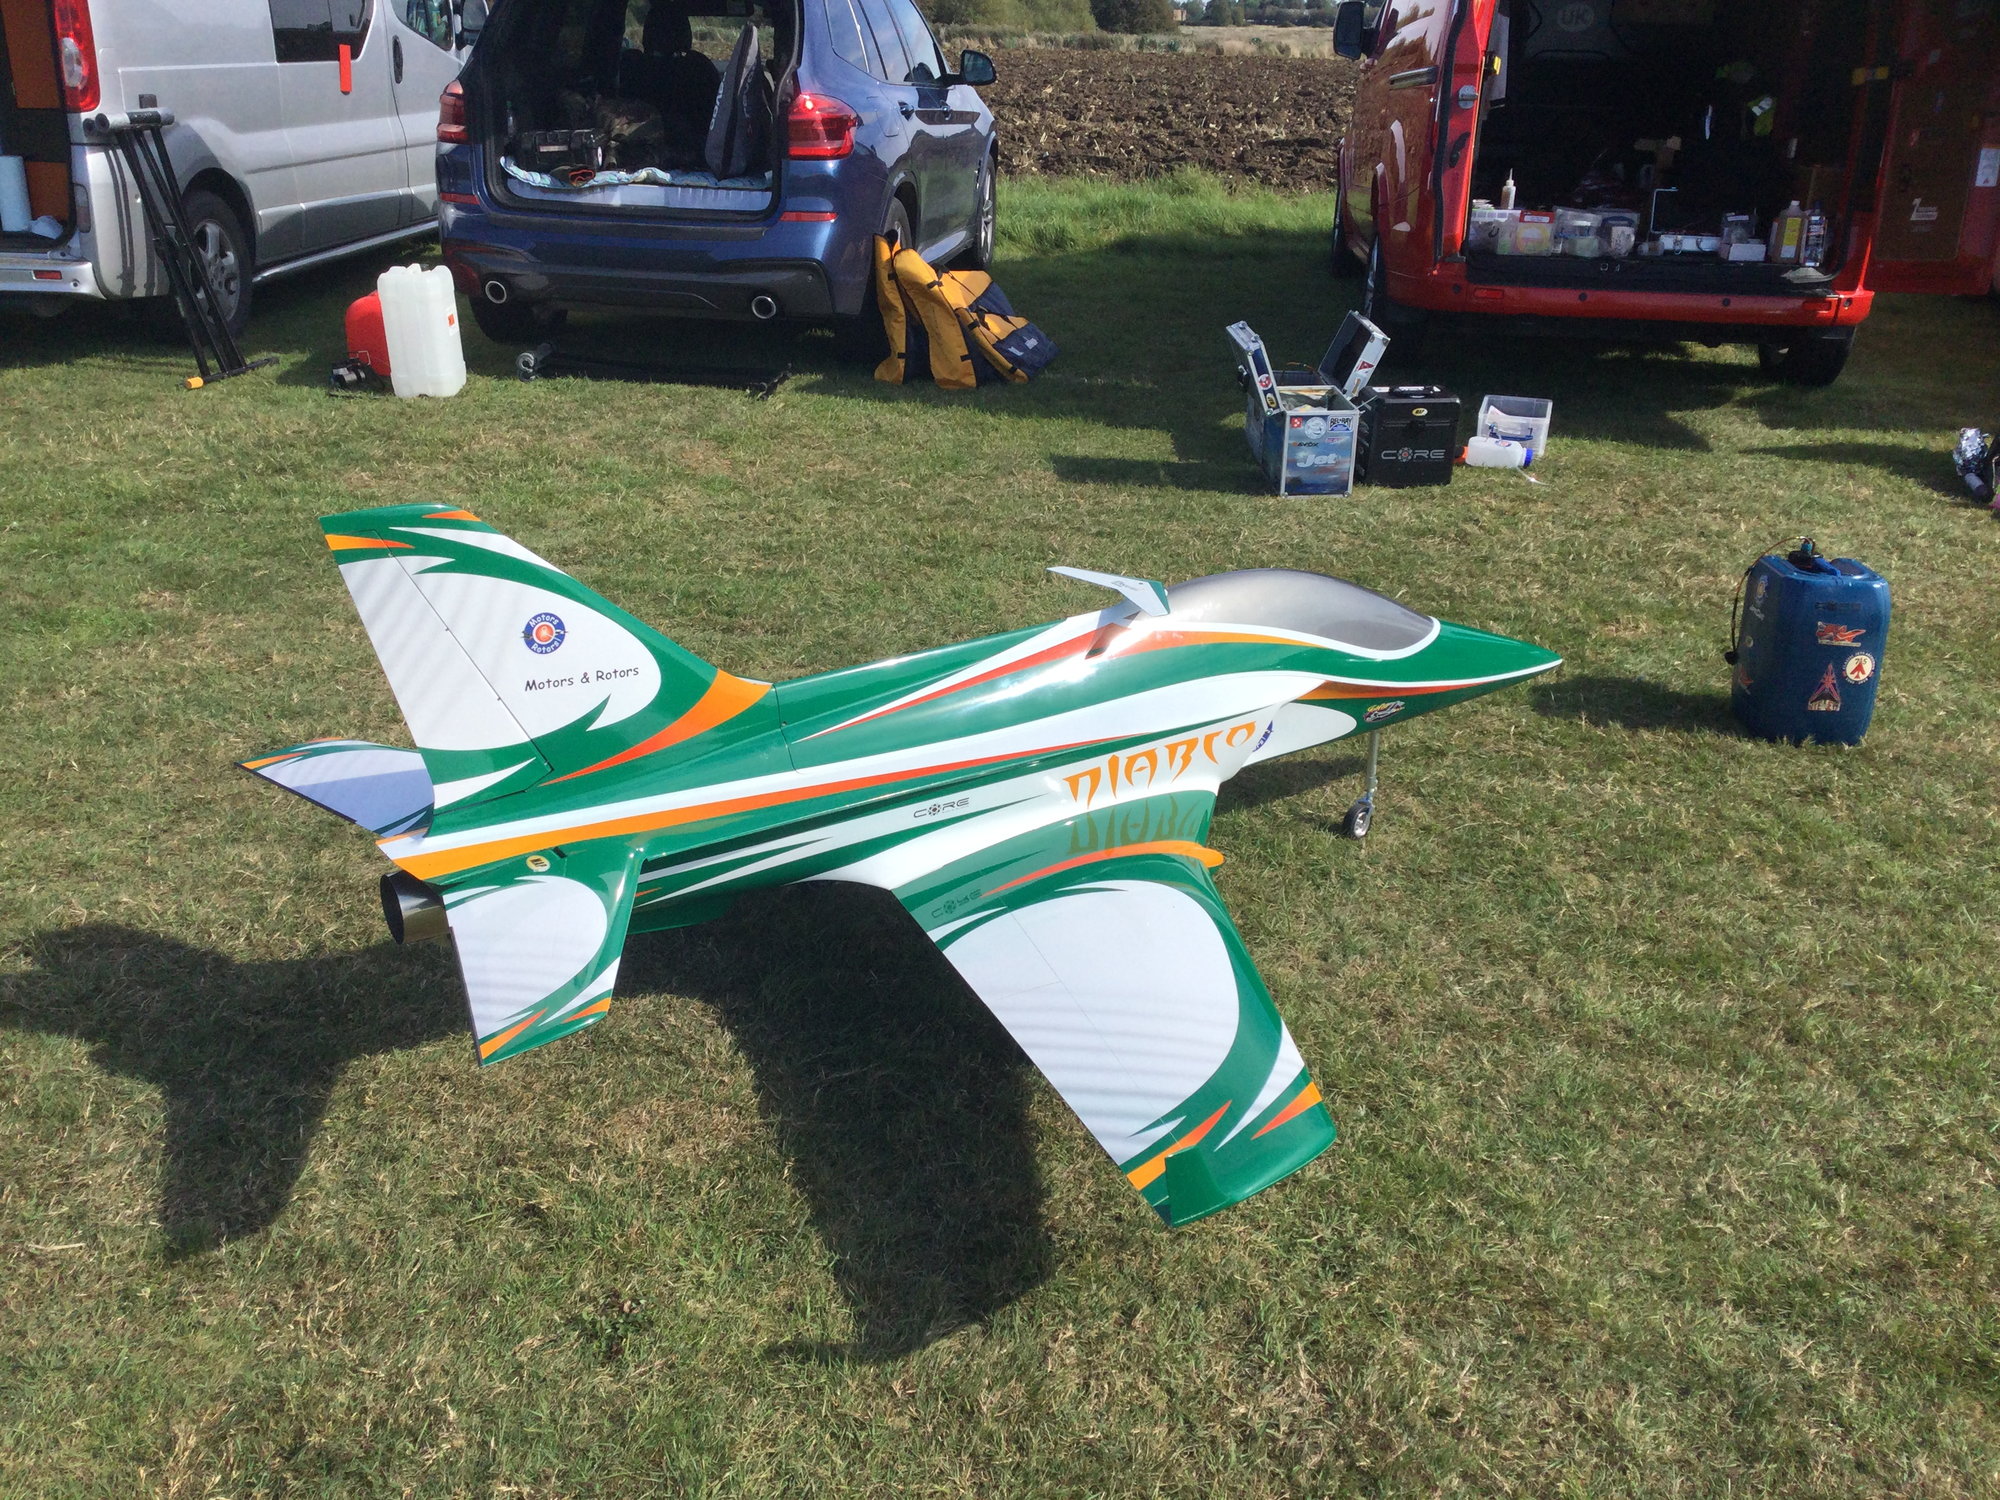
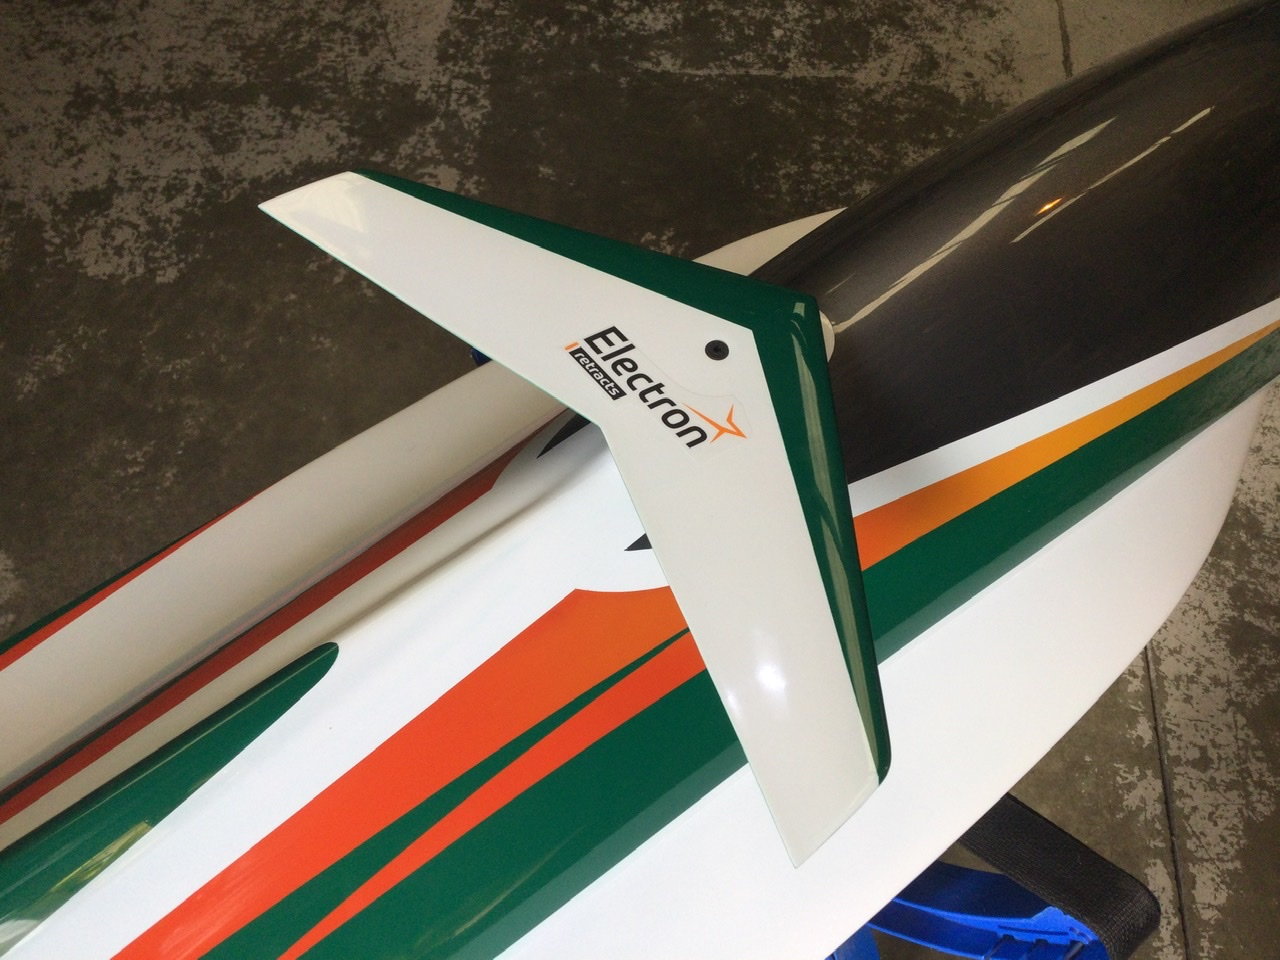
I decided to go for a Green colour swap, since my prototype Mephisto is green too! It looks great with white and orange accents. We have ordered several colour swap schemes for the UK and it’s interesting that they all seem to work!
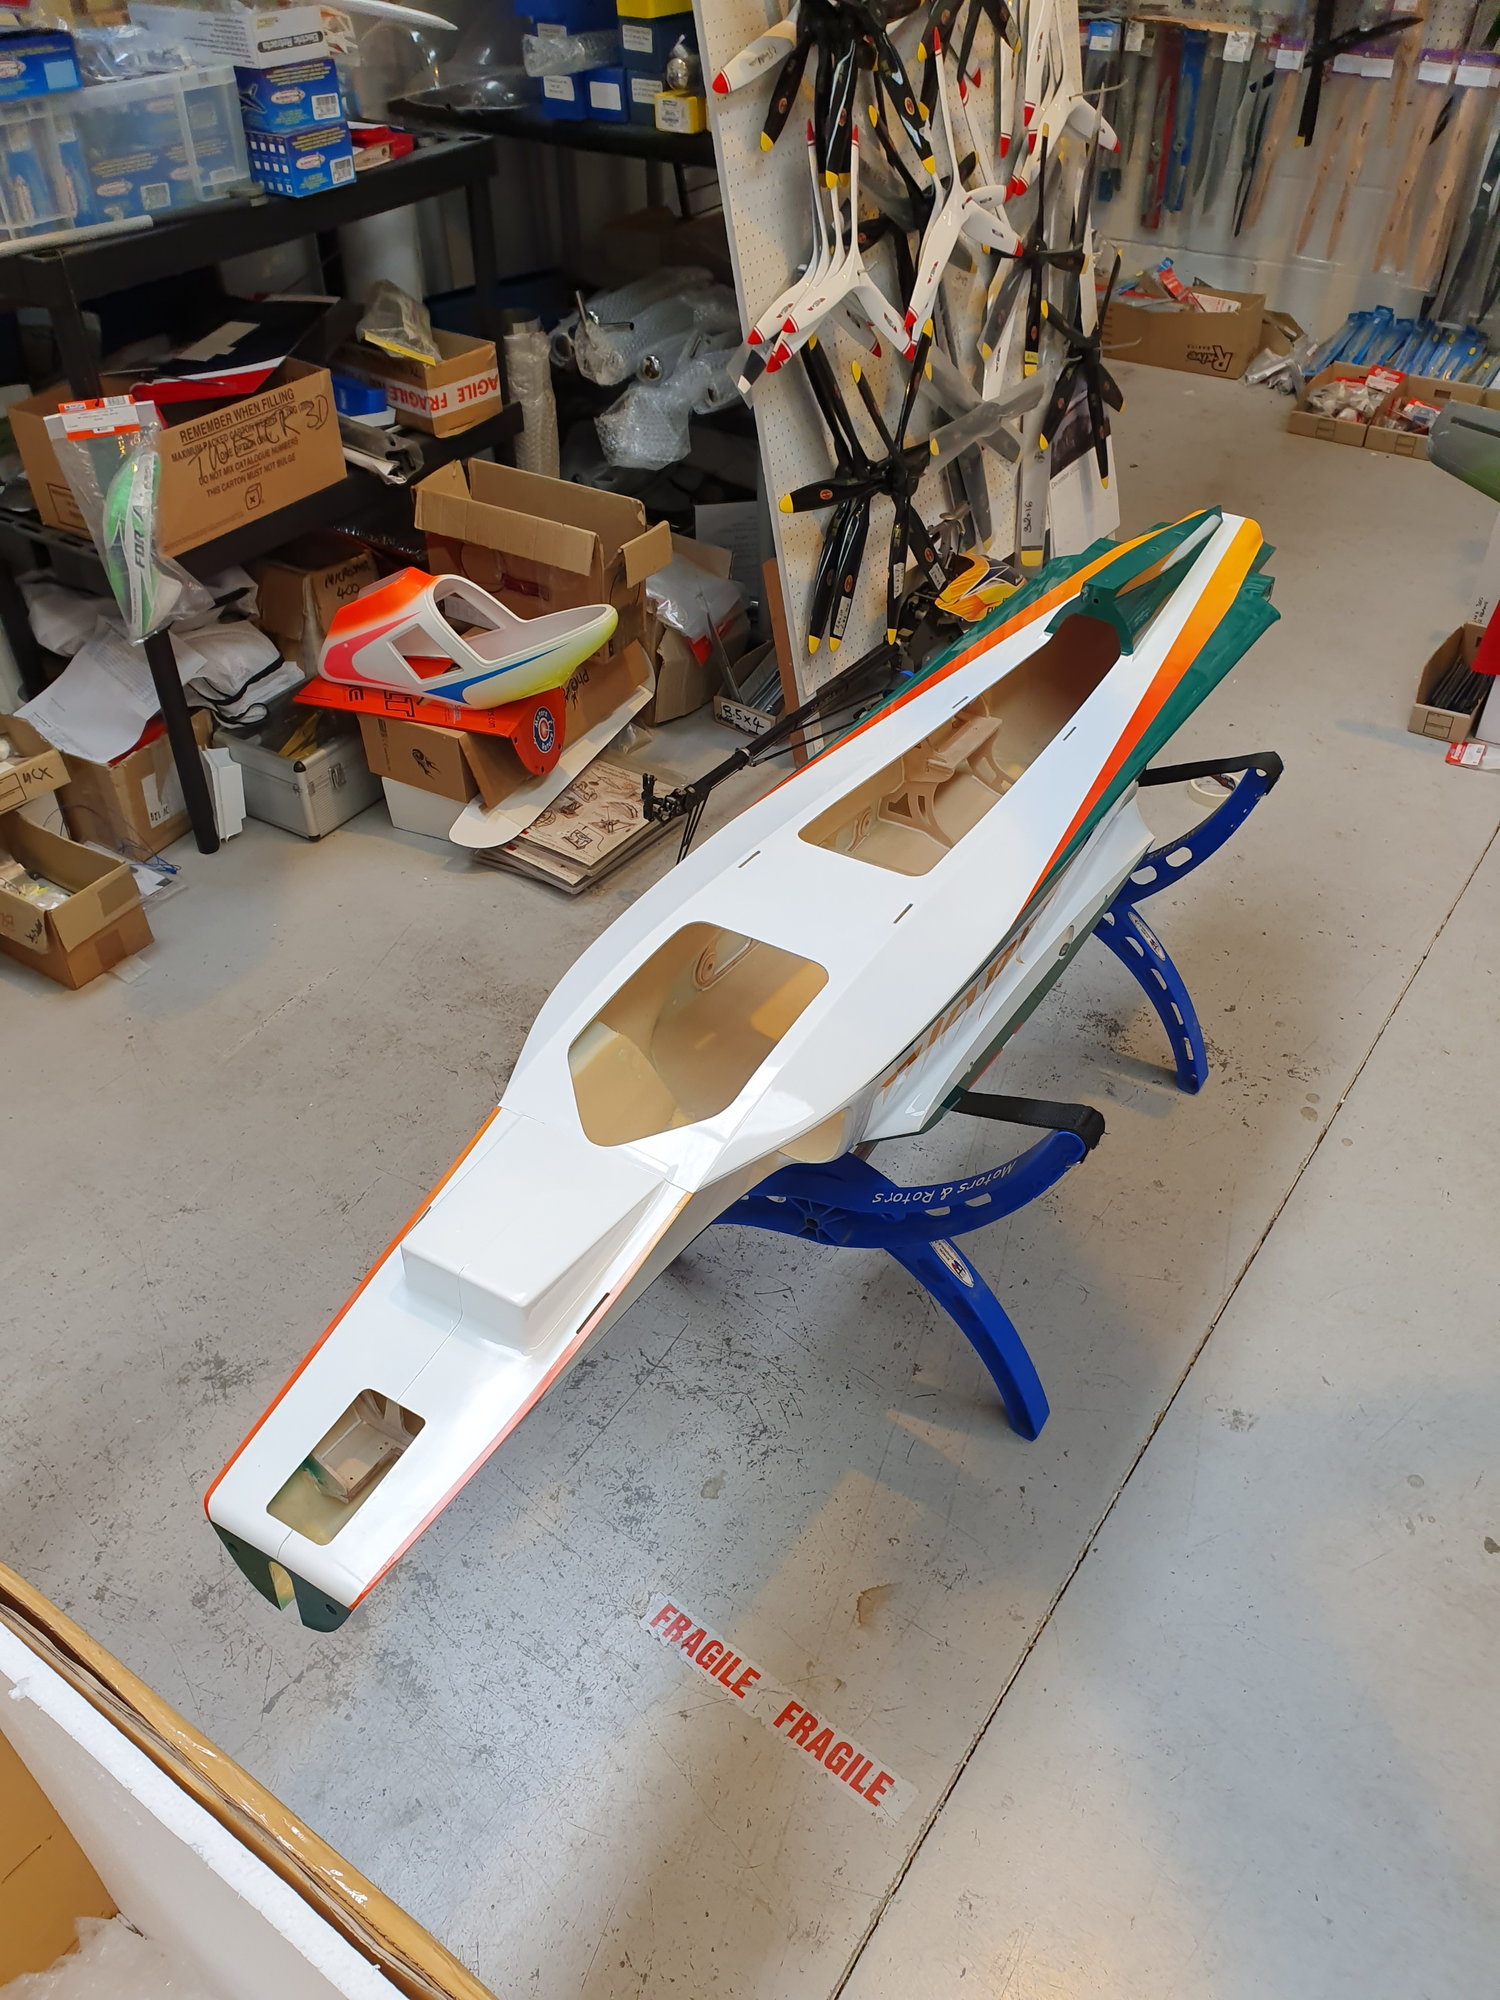
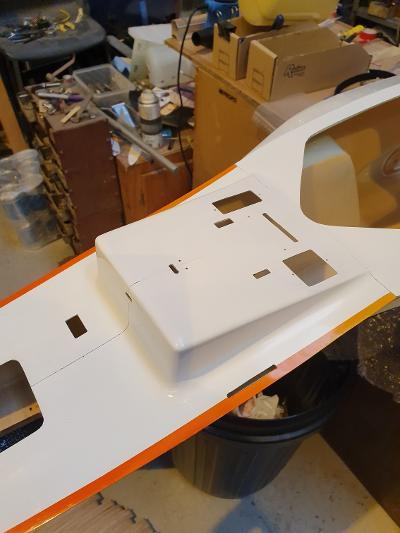
The fuselage layup is very light, so care needs to be taken both handling and protecting the work surface. The wings and tail surfaces are pretty typical CARF construction.
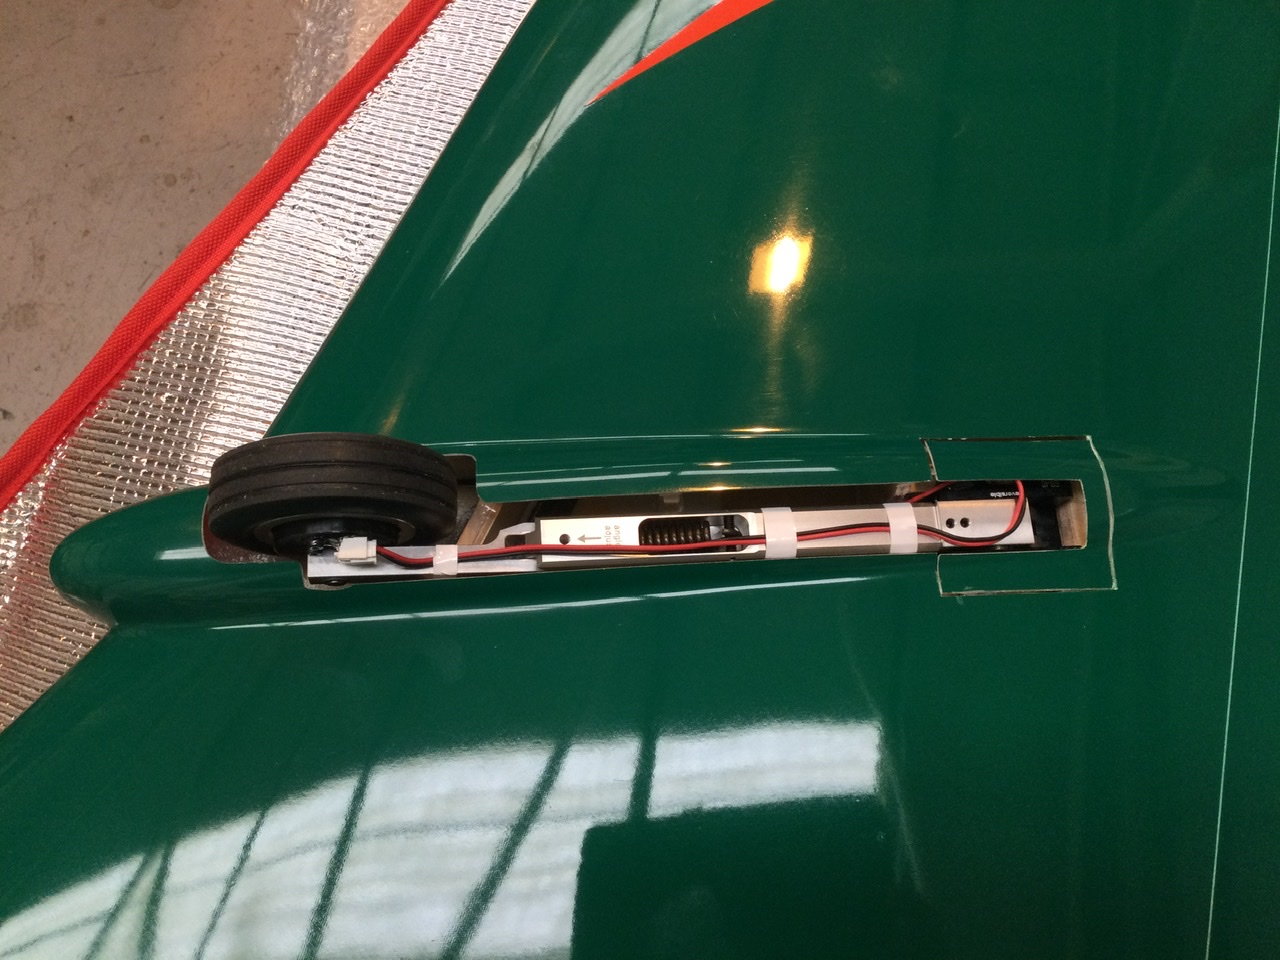
The model has been designed around a special set of electron ER40 retracts, the set from CARF includes the GS200 controller-because this has the facility to operate the gear without the transmitter via the touch screen.
Gear retracts forward like the Mephisto, with peekaboo wheels. The removeable canopy section also houses the nose leg. So, with the gear retracted and top off the nose leg protrudes forward. Like this the length is 2215mm. You can also transport in a car with folded seats with the nose leg down and hook the leg over the seats saving 200mm.
If you transport with the canopy on the total length is 2455mm.
The only tool needed for the hole aeroplane to assemble it is a 3mm allen driver/key to remove the canopy and fit the vertical fin....no tool is needed for tailplane or wing attachment. The tails still pivot like the Mephisto tails, but the designer’s genius has a pin in one tailplane half and the grooved boss on the end of the stab tube is cut away so rotating the right hand tail 90 degrees down releases the pin and the tail slides off!
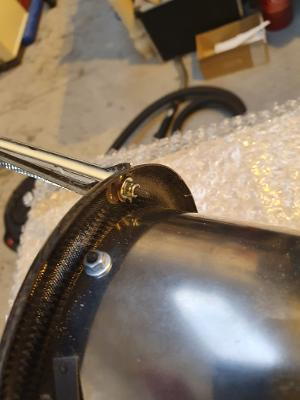
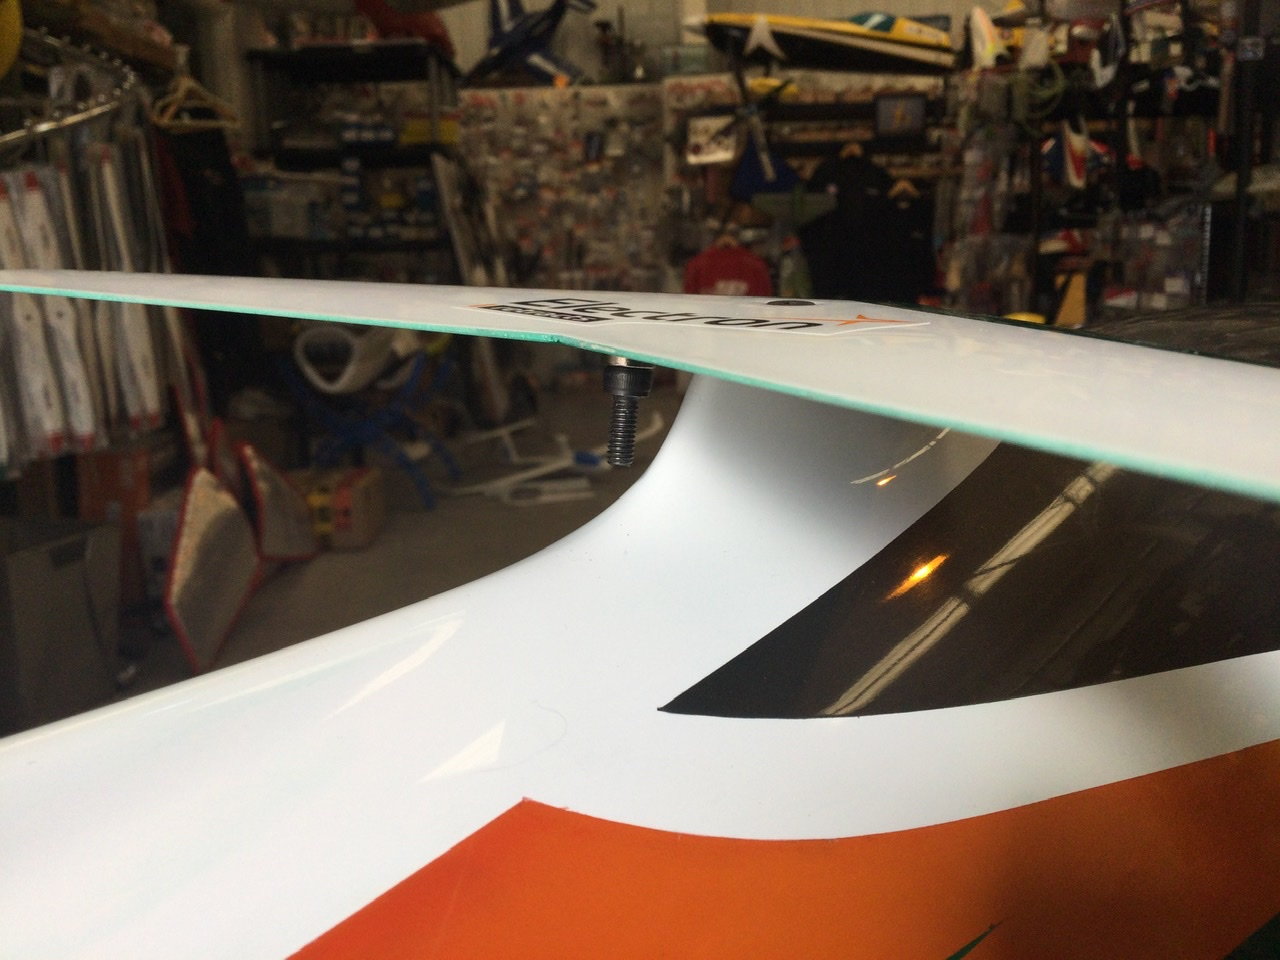
The wings are attached with CARF's well proven 6mm thumb nuts. Access is easiest to the front pair through the huge inlets, the rear through the gap between the top lip and front of the turbine. You will see in the pictures I have scalloped the lip to allow my hands/arms good clearance...Marius and the CARF Young guns are all skinny lads!!
Here are some of the colour swaps coming to the U.K. in the next container


The conversation started within CARF's inner circle, but the big boss felt the layout of the Mephisto would not directly scale because the wings were already relatively high aspect ratio. My simple answer to increase the cord ratio was poo-pooed because it changes other things like the wing section...but the Mephisto proved a huge success and the design costs were met, plus CARF Team Pilots now included some very talented CAD drivers, so the 'young guns' started looking at the problem and in early 2023 Mephisto's baby was born. It could not have worked out better!
The three-part wing and two-part fuselage are not needed and the Diablo transport works out really nicely even in a standard type estate/station wagon car. If you go with the vector option a 200-220N turbine will hover it nicely...do not even think about fitting a 250 unless you fly at extreme altitude, it just does not need it. Because not everyone wants to hover or flip, CARF have a straight pipe option where a turbine 140-160 will power it well-I have a few customers already thinking of the JetCat P-130Rx-B because of its size and weight and actual 150N+ thrust.
There have been two prototypes seen flying in Europe and the USA before production started, both with KT 210 turbines. I was lucky to receive one of the first kits produced in July at the same time Marius from CARF received his own red colour swap kit. Both our builds helped 'de bug' the next production run. If you have a kit now, it’s likely to match my build closely.
I decided to go for a Green colour swap, since my prototype Mephisto is green too! It looks great with white and orange accents. We have ordered several colour swap schemes for the UK and it’s interesting that they all seem to work!
The fuselage layup is very light, so care needs to be taken both handling and protecting the work surface. The wings and tail surfaces are pretty typical CARF construction.
The model has been designed around a special set of electron ER40 retracts, the set from CARF includes the GS200 controller-because this has the facility to operate the gear without the transmitter via the touch screen.
Gear retracts forward like the Mephisto, with peekaboo wheels. The removeable canopy section also houses the nose leg. So, with the gear retracted and top off the nose leg protrudes forward. Like this the length is 2215mm. You can also transport in a car with folded seats with the nose leg down and hook the leg over the seats saving 200mm.
If you transport with the canopy on the total length is 2455mm.
The only tool needed for the hole aeroplane to assemble it is a 3mm allen driver/key to remove the canopy and fit the vertical fin....no tool is needed for tailplane or wing attachment. The tails still pivot like the Mephisto tails, but the designer’s genius has a pin in one tailplane half and the grooved boss on the end of the stab tube is cut away so rotating the right hand tail 90 degrees down releases the pin and the tail slides off!
The wings are attached with CARF's well proven 6mm thumb nuts. Access is easiest to the front pair through the huge inlets, the rear through the gap between the top lip and front of the turbine. You will see in the pictures I have scalloped the lip to allow my hands/arms good clearance...Marius and the CARF Young guns are all skinny lads!!
Here are some of the colour swaps coming to the U.K. in the next container
 09-01-2023, 07:35 AM
#2
Thread Starter
Build is very straight forward, the greatest work is in the wiring-especially with the Vector version. The two prototypes had a small amount of nose weight added to achieve the initial balance (Though after my comments on love of electronic balances the 1000% accurate string method showed the balance 10mm from where the electronic gizmo said!)
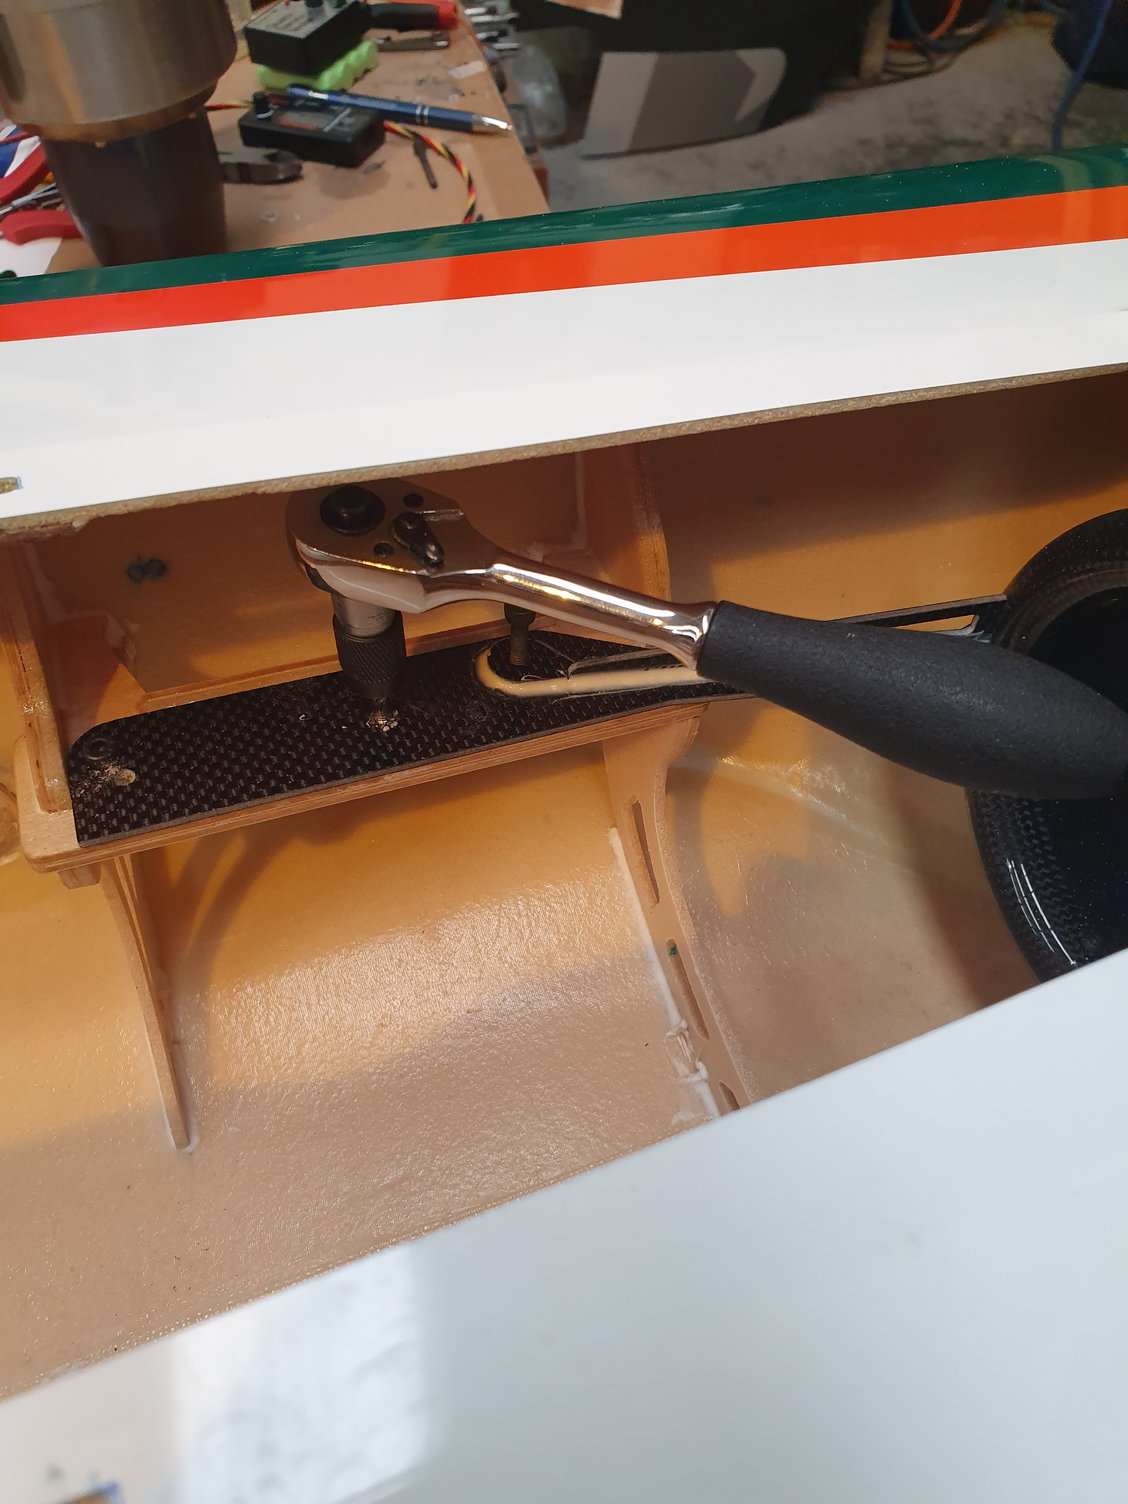
Typically, CARF have done a huge amount of prefabrication, there is very little building/assembling to be done. Its limited to assembling the battery mount cradle, making up the vector pushrods and gluing the tank mount in place.
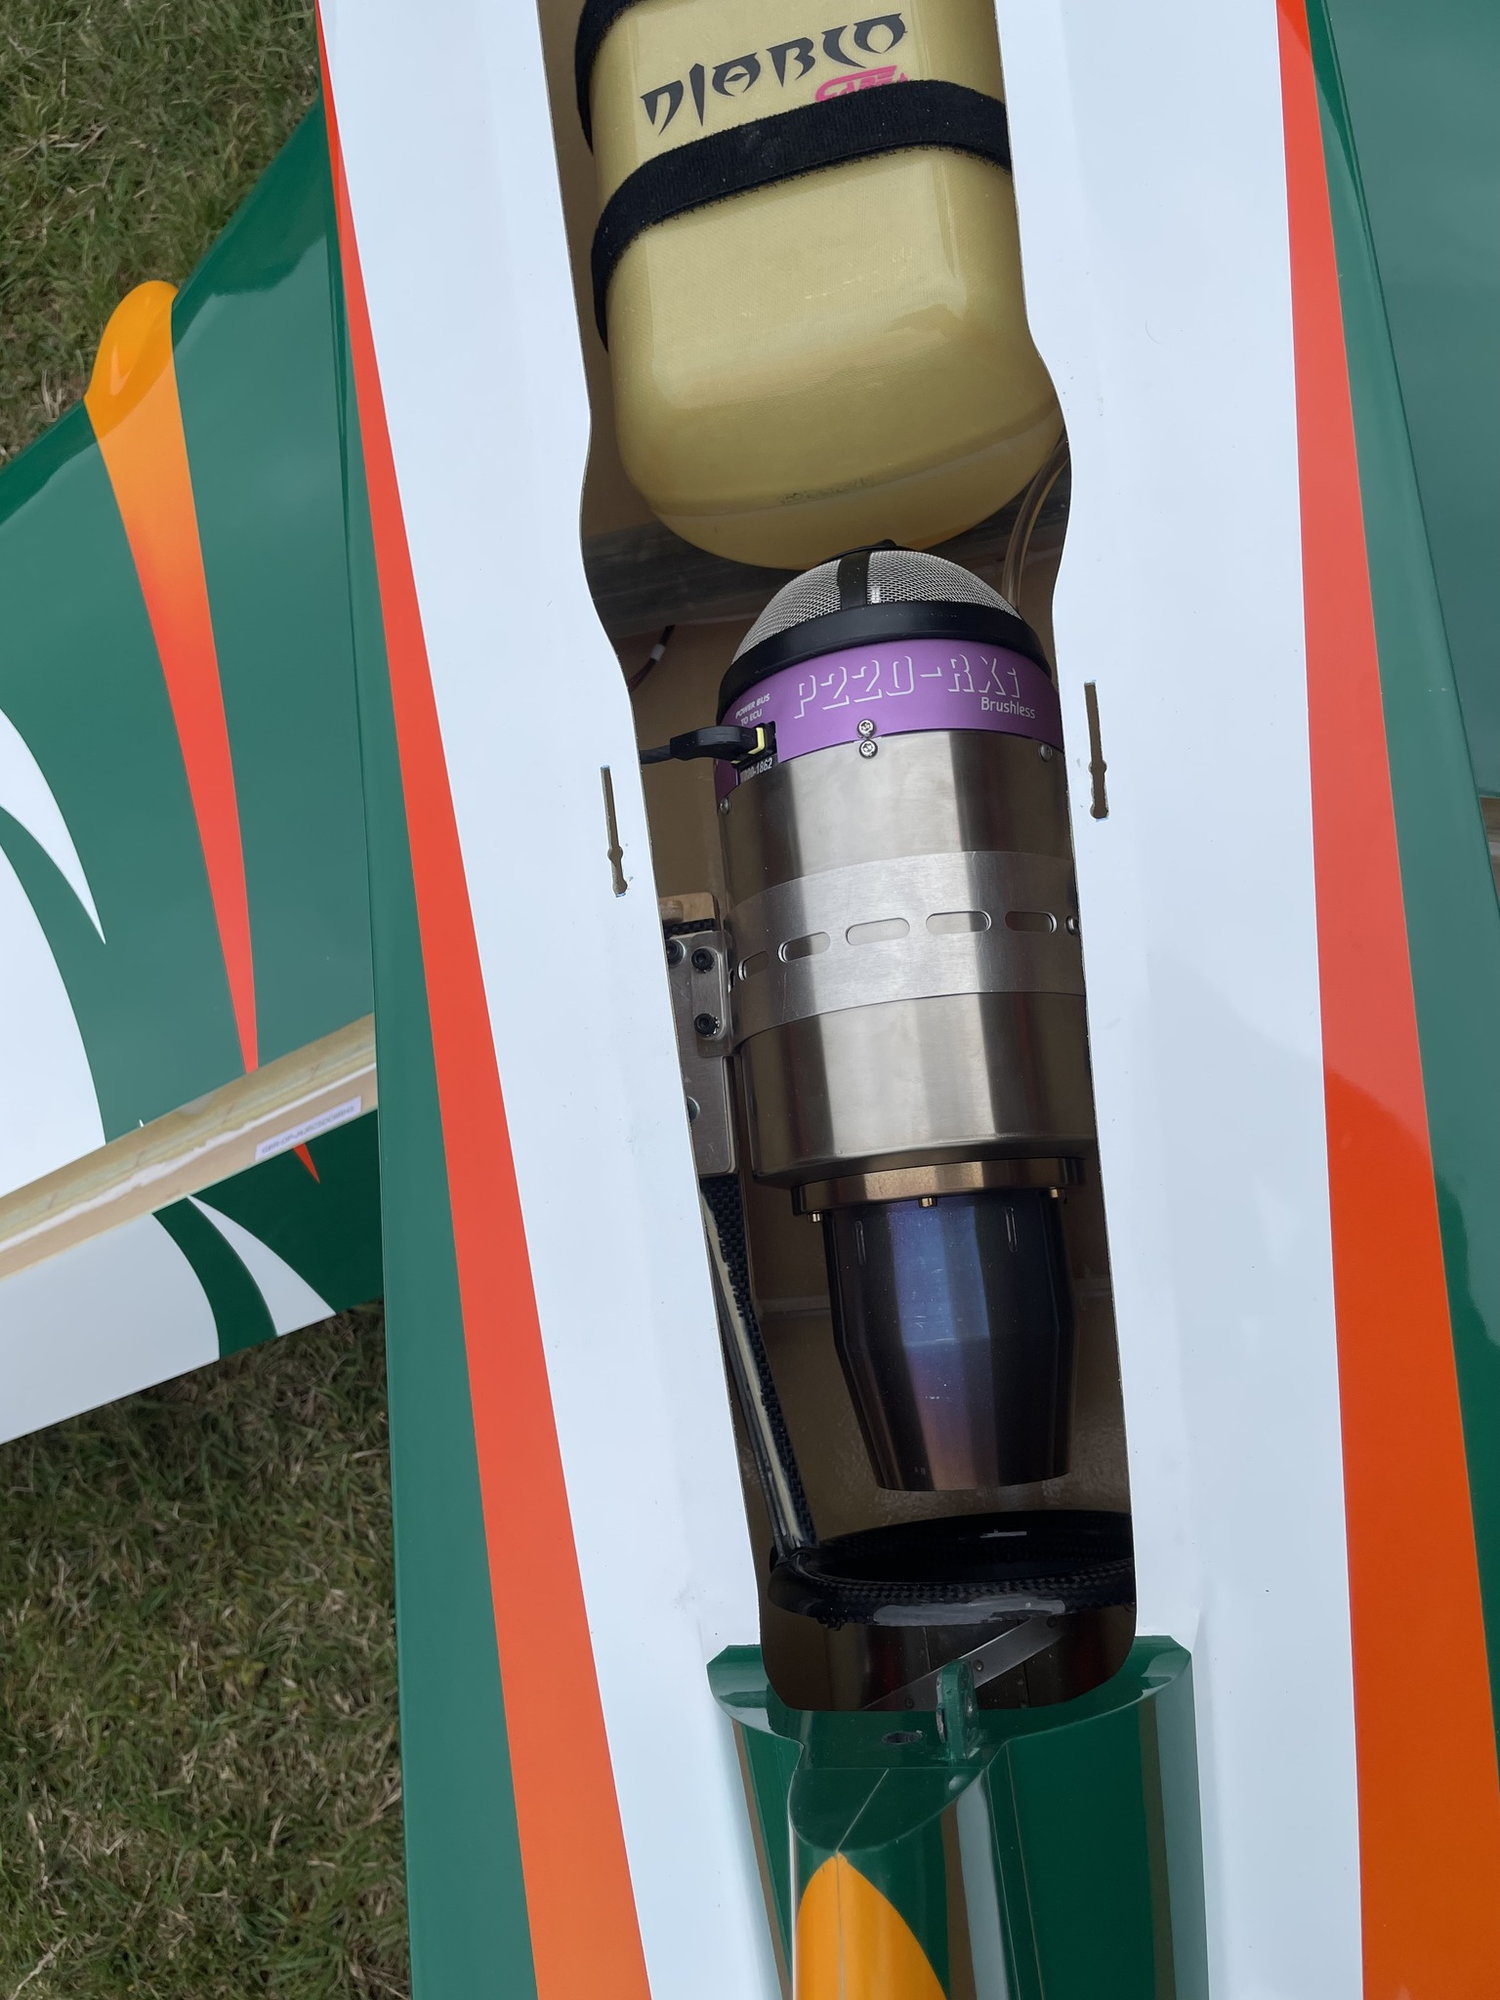
Because of the obsession with kevlar ‘bling’ tanks CARF have made a Kevlar stickered tank for the Diablo and the capacity is just about the maximum possible. So no aftermarket tank needed! Depending on your turbine choice the tank mount either straddles the wing spar, or as mine with a JetCat P-220Rxi-B sits in front. The actual fore-aft position of the tank only varies by around 12mm KT210 to the JetCat.
Any 200-220N turbine will hover the Diablo, fitting anything larger is just not required and since many of the 250N turbines have higher idle thrust it would be detrimental to the landing speed-the pipe is also designed for 220N maximum.
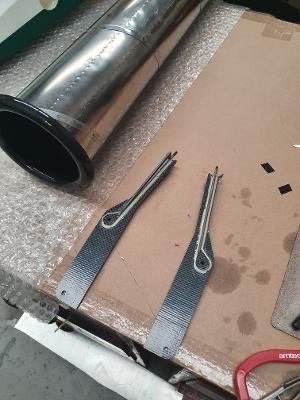
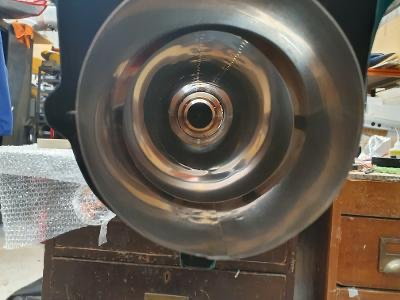
The pipe mount is very clever, it’s part of the turbine mounting plates, the vector unit and linkages stay in the fuselage and the thrust tube removes easily sliding out the hatch area.
I started the build at the back end as my usual process.
My model uses MacGregor servos throughout as the two prototype airframes seen this season. At the time I started building my kit the CARF arms were not available, but now it’s possible to get a Diablo set. Arms are all between 1" and 1.5" length.
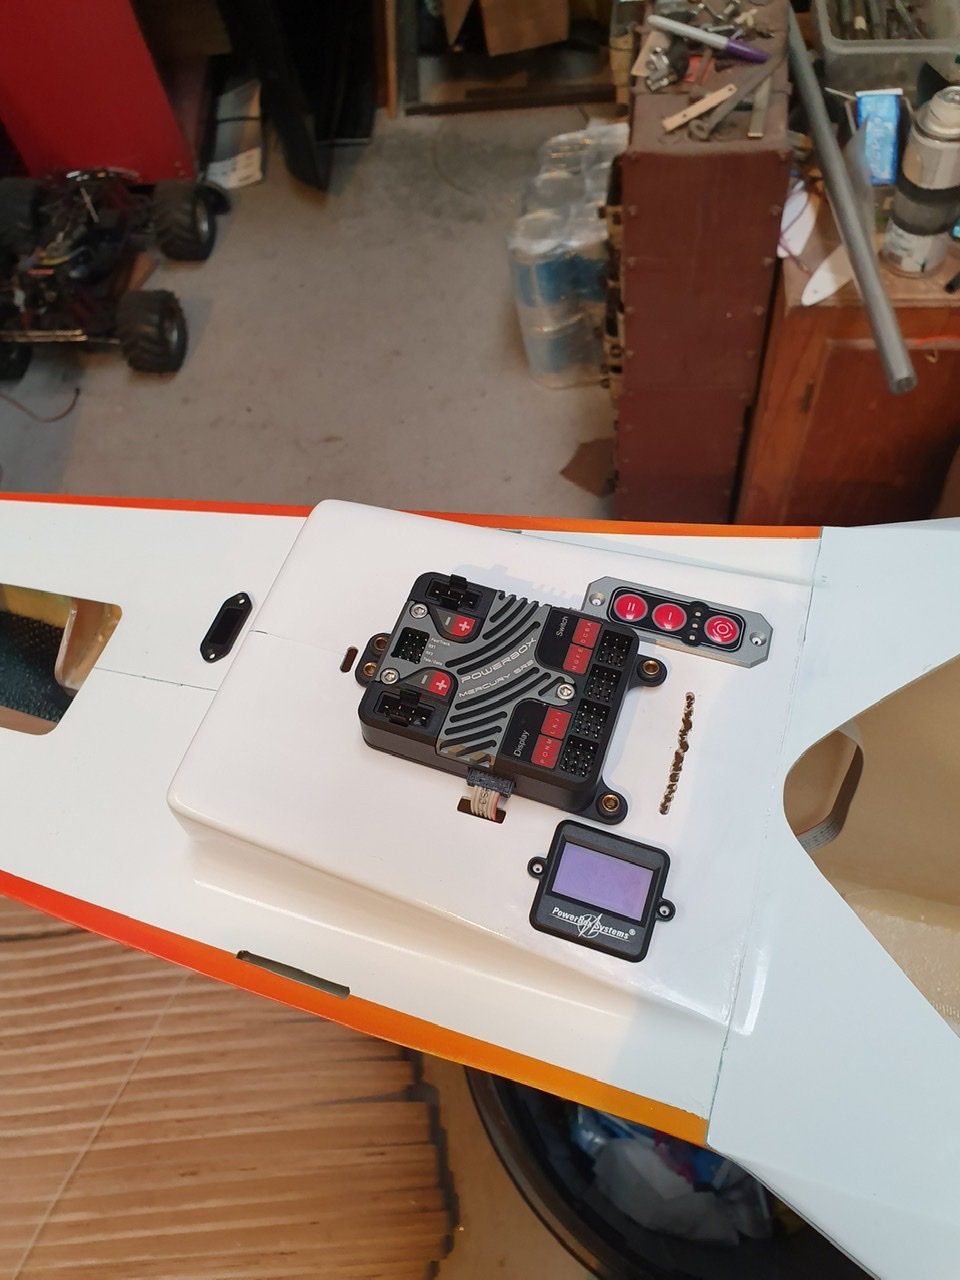
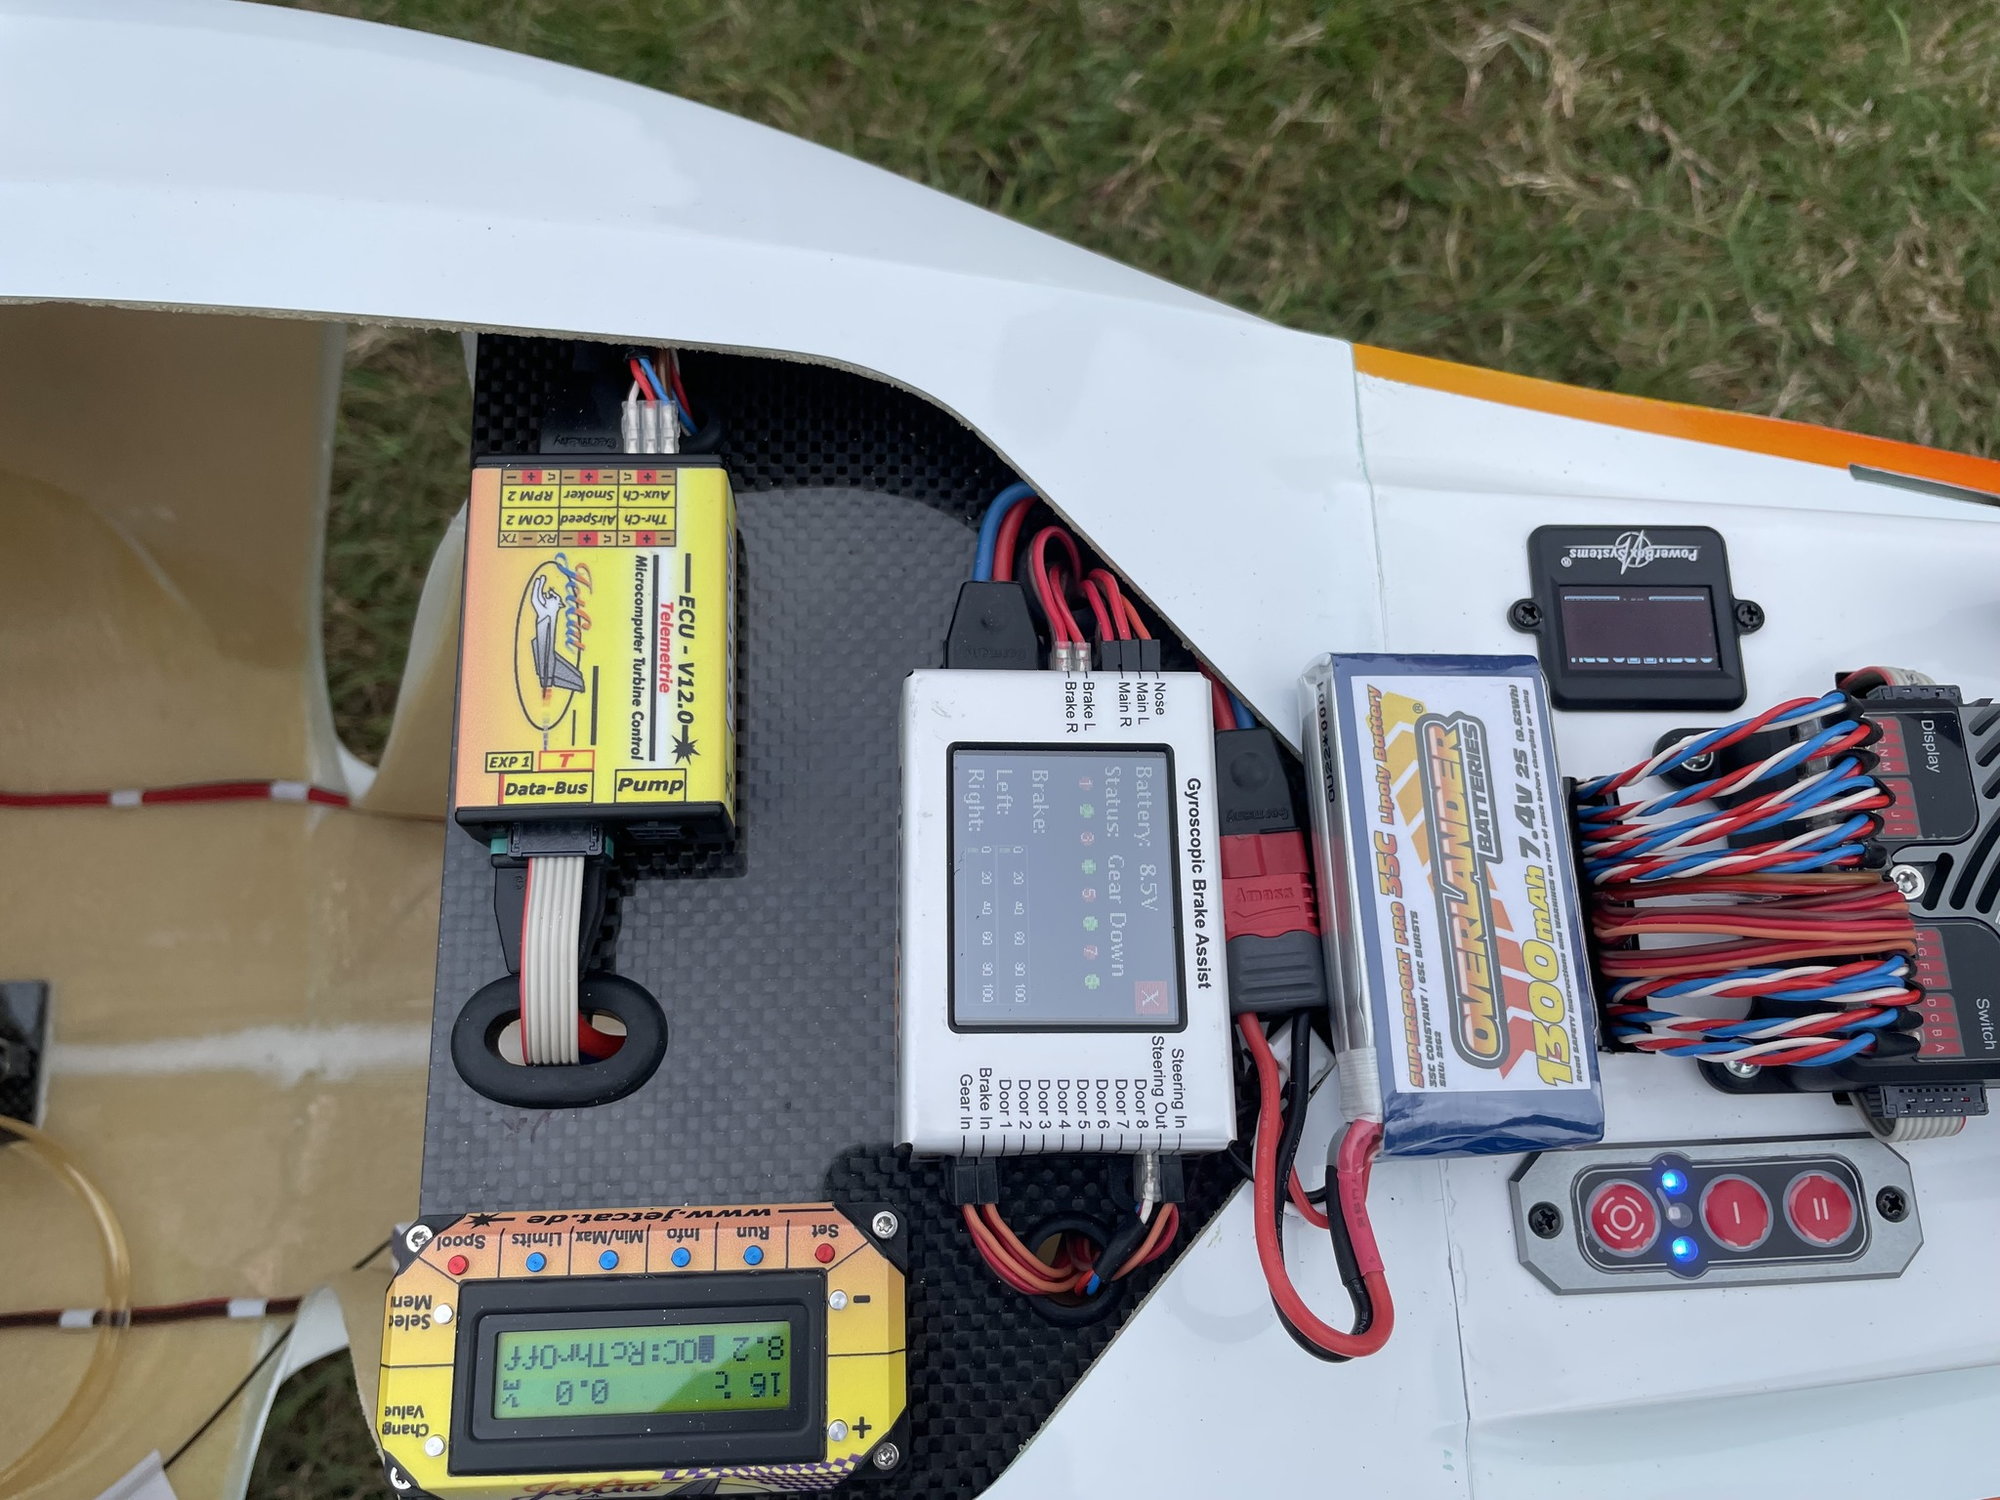
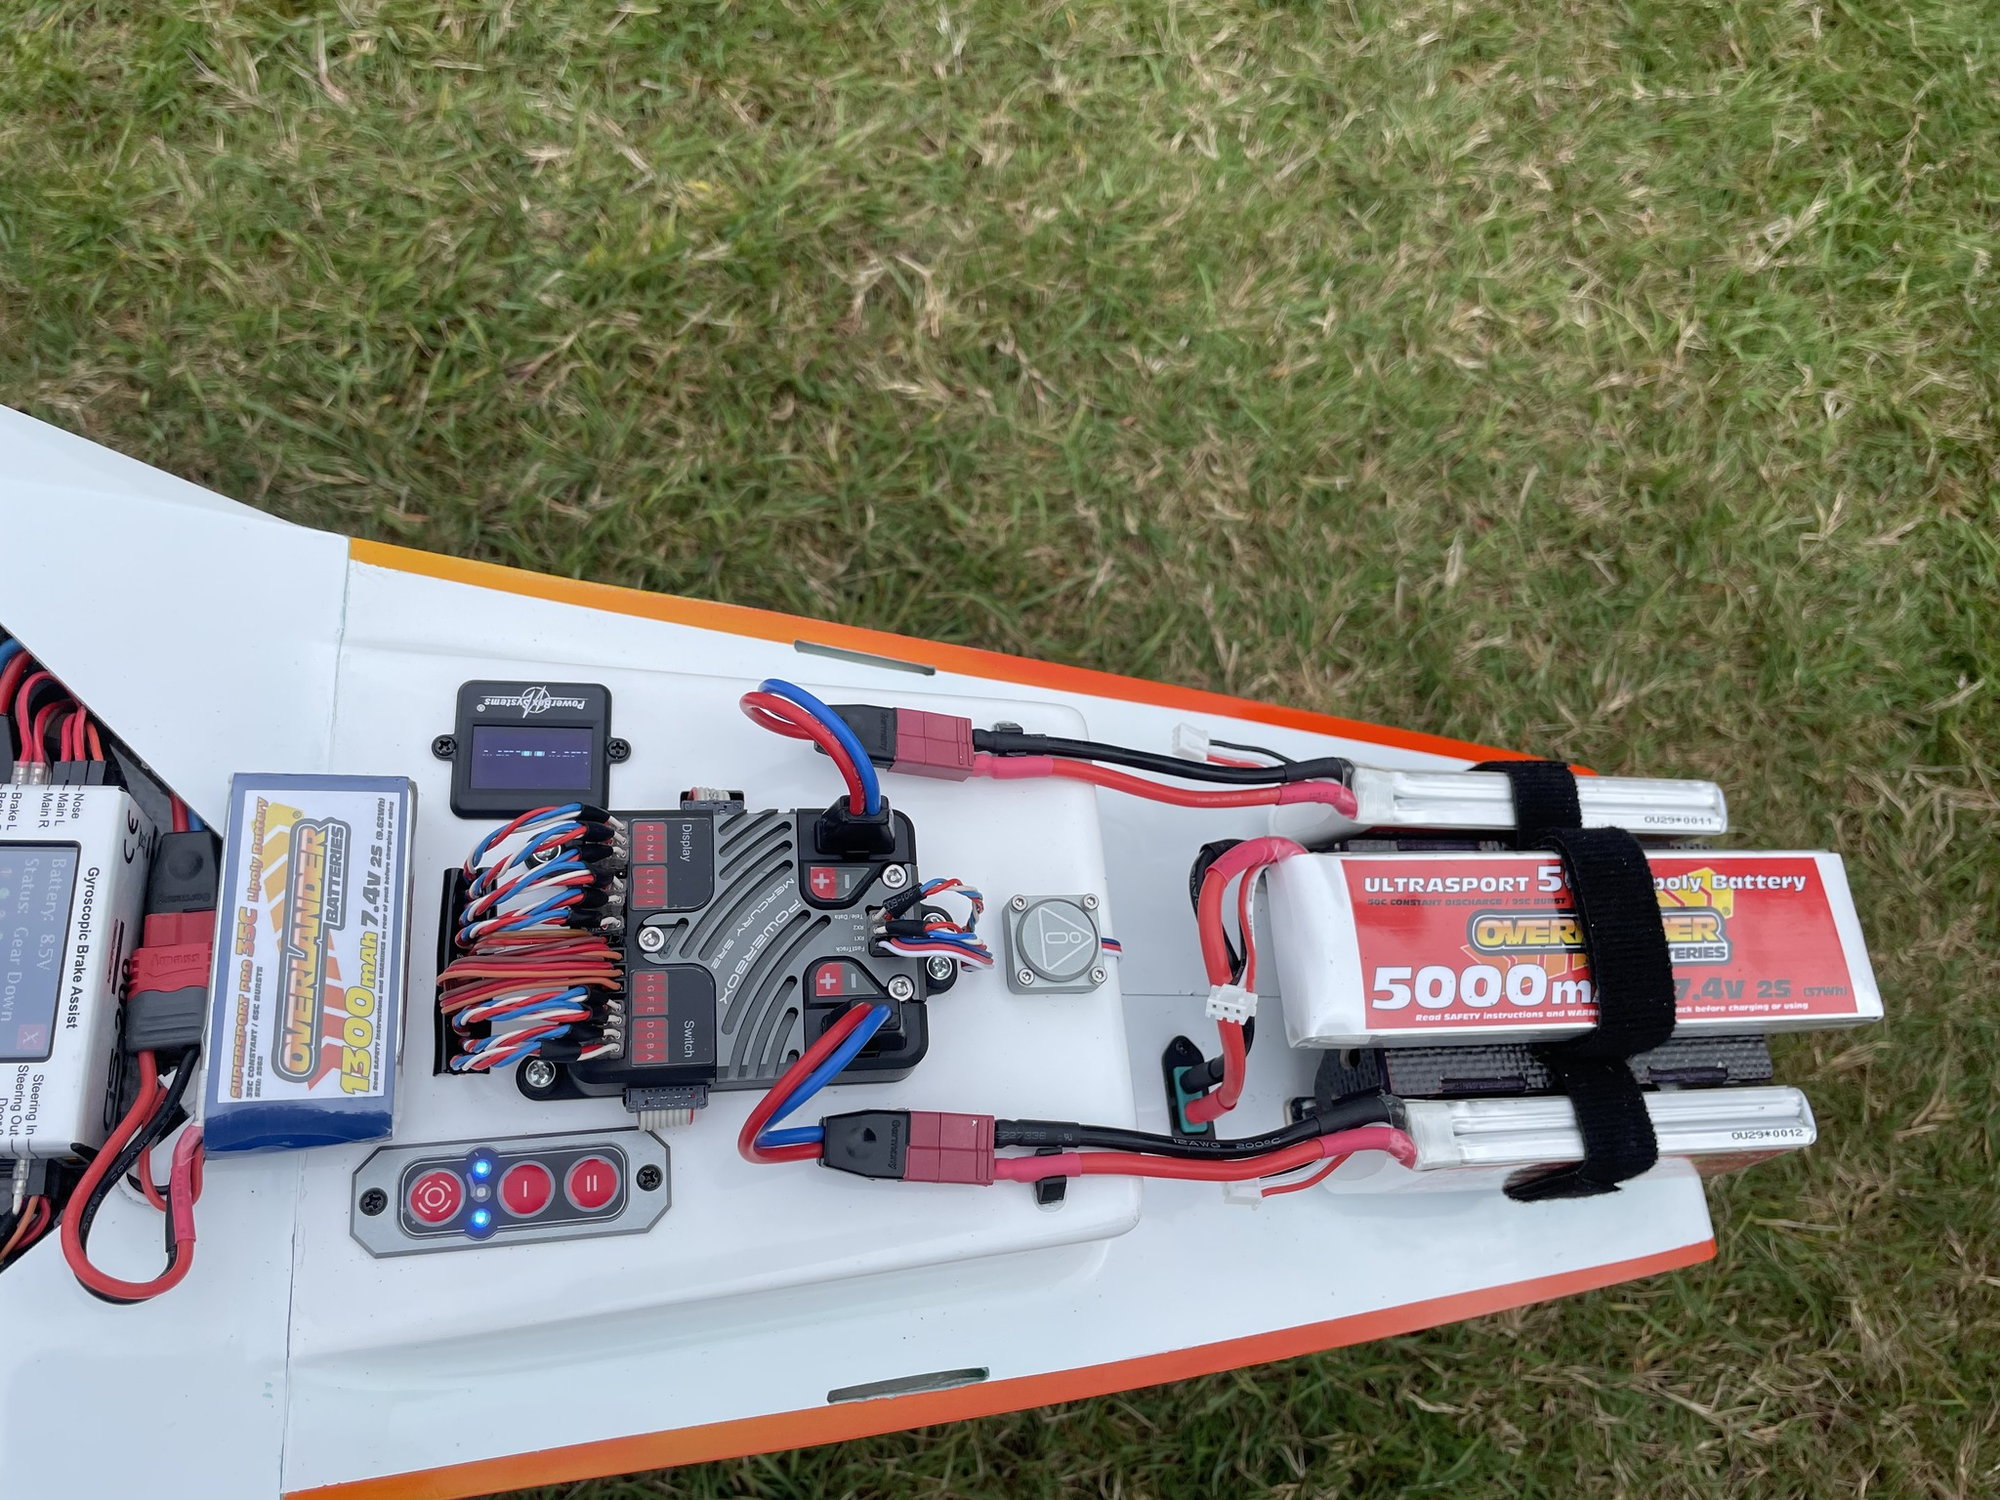
My model is using the new Powerbox Mercury SR2 and excellent iSat gyro. Batteries I ended up with 1 x 5000 2s ECU and 2 x 2700 2s Rx packs, as my normal process I will run a separate retract pack.
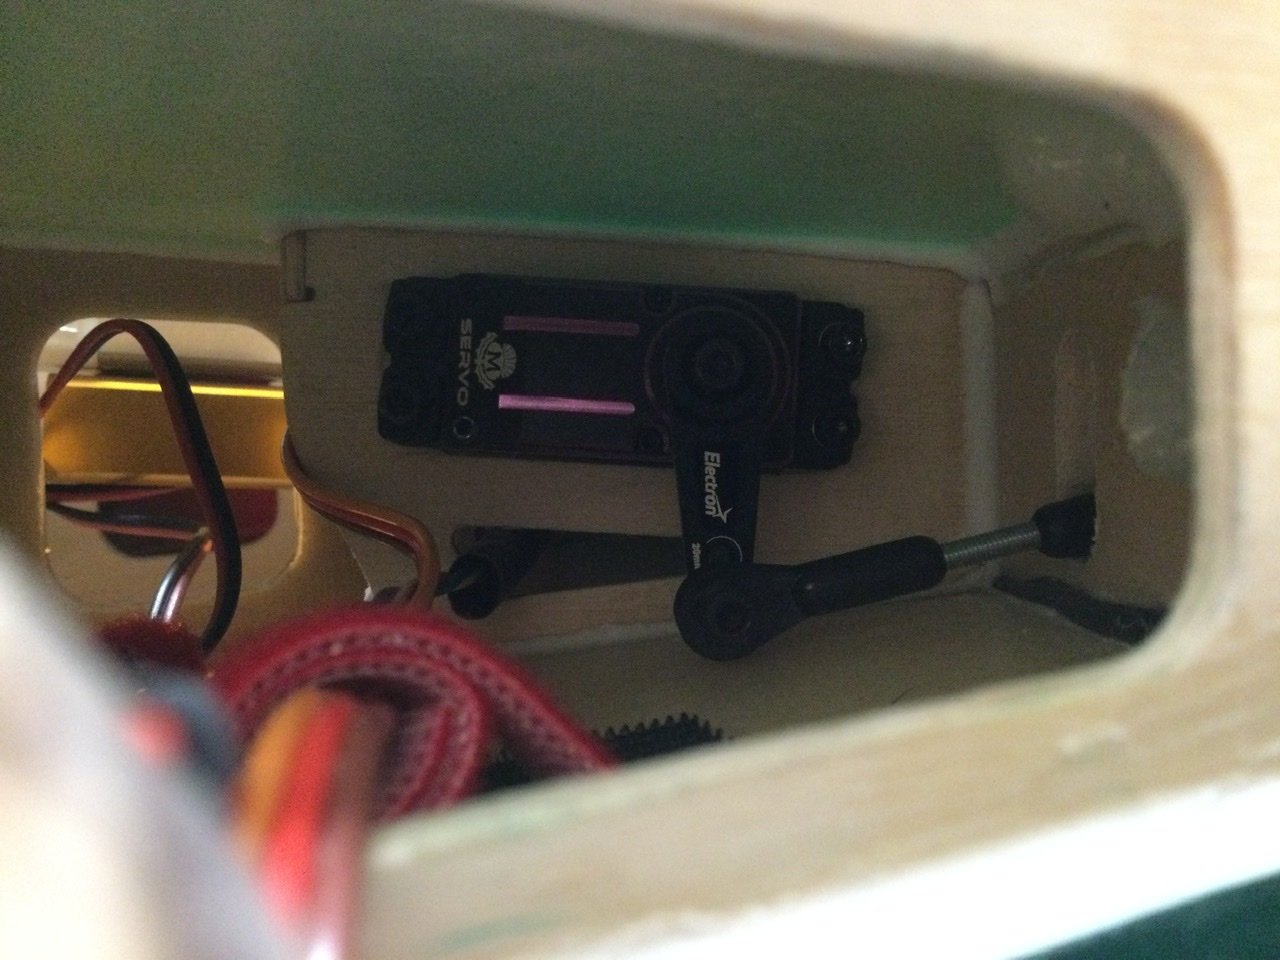
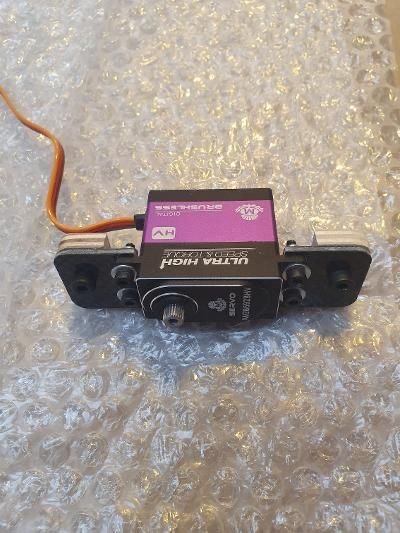
Because the Diablo uses a single servo per elevator half it needs to be a strong servo, I'm using the Macgregor 55kg Brushless servo. To keep the torque high the servo arm is kept as short as possible, I'm using the CARF 1" arm and because of the servo area depth clearance is required around the ball links at full travel.
The servo screws in without grommets so its solidly mounted.
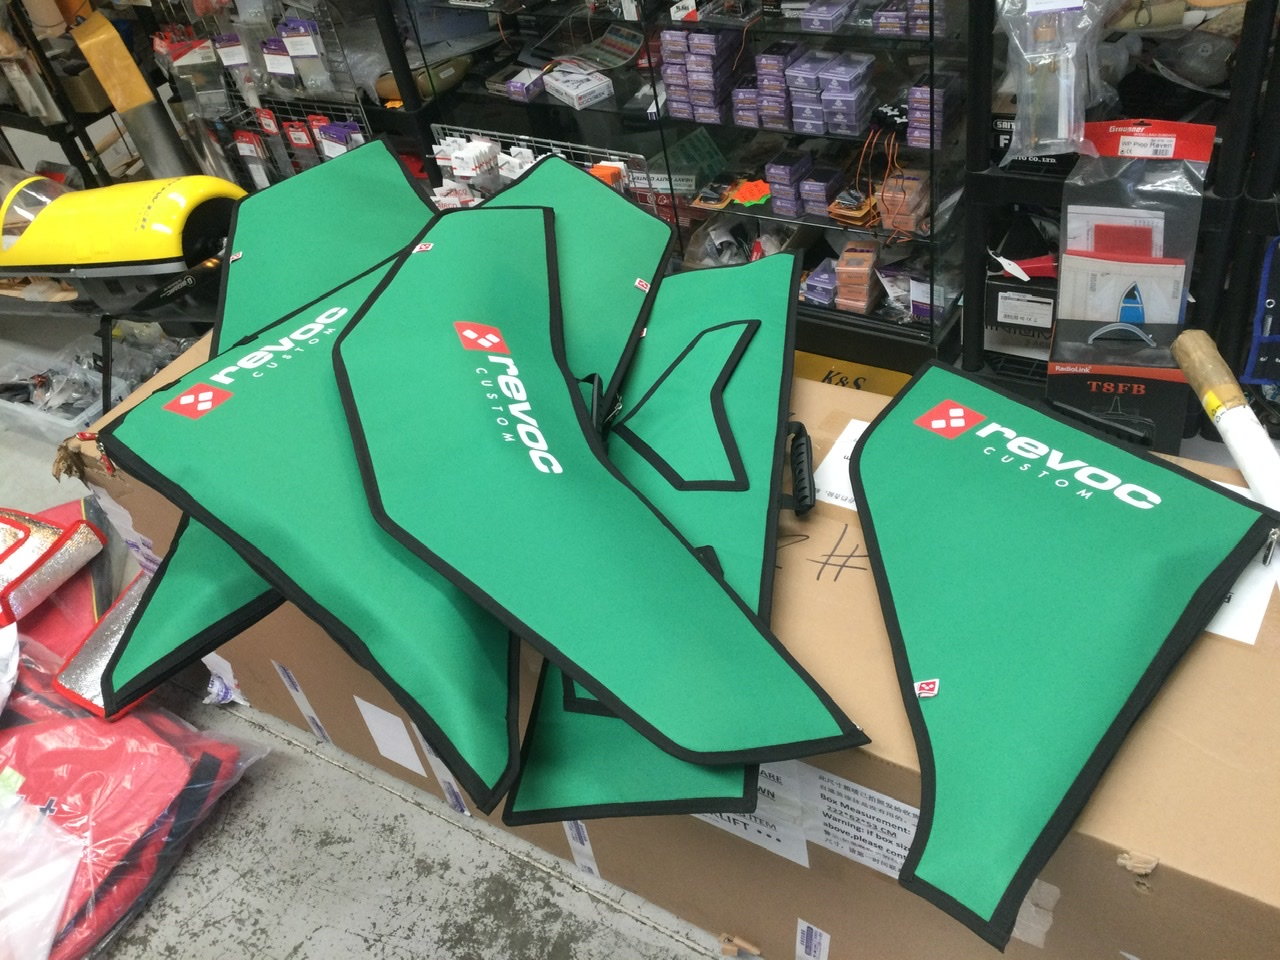
The supplied pushrod is 4mm with a carbon sleeve, the forked clevis and Ball link are 4mm items. One slight strangle thing with the setup is if you remove the tailplane halves for transport the pushrod hangs vertically. I found some silicon tube that easily slides over the clevis to protect the fuselage. (I have Revoc wing and tail bags coming, but I'm waiting until they have a fuselage bag that fits first time!!)


Typically, CARF have done a huge amount of prefabrication, there is very little building/assembling to be done. Its limited to assembling the battery mount cradle, making up the vector pushrods and gluing the tank mount in place.
Because of the obsession with kevlar ‘bling’ tanks CARF have made a Kevlar stickered tank for the Diablo and the capacity is just about the maximum possible. So no aftermarket tank needed! Depending on your turbine choice the tank mount either straddles the wing spar, or as mine with a JetCat P-220Rxi-B sits in front. The actual fore-aft position of the tank only varies by around 12mm KT210 to the JetCat.
Any 200-220N turbine will hover the Diablo, fitting anything larger is just not required and since many of the 250N turbines have higher idle thrust it would be detrimental to the landing speed-the pipe is also designed for 220N maximum.
The pipe mount is very clever, it’s part of the turbine mounting plates, the vector unit and linkages stay in the fuselage and the thrust tube removes easily sliding out the hatch area.
I started the build at the back end as my usual process.
My model uses MacGregor servos throughout as the two prototype airframes seen this season. At the time I started building my kit the CARF arms were not available, but now it’s possible to get a Diablo set. Arms are all between 1" and 1.5" length.
My model is using the new Powerbox Mercury SR2 and excellent iSat gyro. Batteries I ended up with 1 x 5000 2s ECU and 2 x 2700 2s Rx packs, as my normal process I will run a separate retract pack.
Because the Diablo uses a single servo per elevator half it needs to be a strong servo, I'm using the Macgregor 55kg Brushless servo. To keep the torque high the servo arm is kept as short as possible, I'm using the CARF 1" arm and because of the servo area depth clearance is required around the ball links at full travel.
The servo screws in without grommets so its solidly mounted.
The supplied pushrod is 4mm with a carbon sleeve, the forked clevis and Ball link are 4mm items. One slight strangle thing with the setup is if you remove the tailplane halves for transport the pushrod hangs vertically. I found some silicon tube that easily slides over the clevis to protect the fuselage. (I have Revoc wing and tail bags coming, but I'm waiting until they have a fuselage bag that fits first time!!)
09-01-2023, 10:22 AM
#3
Thread Starter
The vector servo mount is factory fitted. This is one area where we found a slight issue on the first kits. The mount is bonded in a few mm too close to the centre line and as a result the pitch (elevator) carbon mounting plate needs packing off the wood mount by 6-8mm depending on the servo arm offset used. The position also means that the Yaw (rudder) vector arm cannot be any longer than 34mm radius or the ball link is on the thrust tube. 34mm gives plenty of travel so it works for both axis.
Running the servo leads forward for elevators, rudder and vector servos is really easy as there is so little structure in the Diablo fuselage! I used Powerbox Maxi wire and my usual electrical insulation tape wrapped fixings that are simply tack glued down with Slo ZAP. Super easy and very light!
Wings are really straightforward. Aileron servos screw to aluminium angle brackets. 1” is about right in length. The flap servo screws into one of the root ribs. It’s important to set the arm position using your radio before you screw the servo in place.
The Electron retract ER40’s drop in to the wood mounts, CARF supply their favoured CSK wood screws. I wasn’t sure at first, but I have had no issues so I used these to screw the units in. A small amount of trimming was required to clear the wheels neatly.
As normal I Dremel flats on the pins for the M4 set screws…it is needed!
I was going to use Powerbox’s Two4One cable with the two signal wires removed for the retracts and brakes, but I found some MPX 4 pin connectors that I had to solder up…I wish I used the PB leads!!
The cover plates for the retract mechanics could be screwed in place if you put tabs in, or as mine I decided to use four big blobs of Silicon RV to stick them in place.
Fuel tank.
As standard now, CARF have moved over to the screw in fittings-this makes tank assembly a job of moments! The tank kit includes a weighted clunk, but as normal I used one of my Hi-Flow brass Felt clunks on a Tygon tube line. The tank shape is great and almost square, so the clunk moves around freely.
I used my standard go to MAP 6oz hopper tank, CARF are going the same way after trouble with some of the bling traps. Marius has an MAP bubble trap in his new Red Diablo. I offset my bubble trap so the feed nipple is on the centre line to take the tank feed line.
This also allows the overflow line to go just in front of the bubble trap and stay on the centre line. I used my std Festo 6mm Festo bulkhead fitting as the overflow fitting.
09-01-2023, 02:22 PM
#4

My Feedback: (10)
Join Date: Aug 2005
Location: Lehi, UT
Posts: 24
Likes: 0
Received 0 Likes
on
0 Posts
Thank you for the assembly description Dave! I ordered one with yellow, white, black color swap you pictured above back in April and anxious to get it and get the build going. I appreciate your notes on the assembly.
Darin
Darin
09-01-2023, 05:08 PM
#5
Awesome Dave. Keep the pics coming!!
09-02-2023, 09:05 AM
#6
D.W. Test flew his Diablo today at Deenethorpe U.K. No drama at all looks amazing in that scheme, Jetcat 220, Powerbox core typical M&R set up.
Will post a few photographs
Alistair Powers


Will post a few photographs
Alistair Powers

 09-02-2023, 11:32 AM
#8
Hi Dave,
As you mentioned at the beginning of your first post in this thread, I’m one of those people who have been waiting for the smaler Mephisto Version…
I have a new Jetcat 160Rxi in the shelf which is waiting for a new jet…
It would be great if I could use it together with the vector pipe which is offered for the Diablo.
I know that hoovering will not be possible with just 155N trust but different flight chrateristics in flight would be possible, that with the straight pipe.
Is there anything that would speak against this combination or does it not make sense like this?
Thank you very much
br
Last edited by kuki; 09-02-2023 at 11:36 AM.
09-02-2023, 11:59 AM
#9
Thread Starter
JetCat P-160Rxi-B is a turned down 180. So actually it’s around 168N…
Perfect for the Diablo, suitable for pin wheels and spins. My straight pipe customers one will use the 160Rxi-B too
Dave
Perfect for the Diablo, suitable for pin wheels and spins. My straight pipe customers one will use the 160Rxi-B too
Dave
09-02-2023, 12:30 PM
#10
Thanks, but the question was if the 160 would work also with the vector pipe, or does it just make sense with the straight pipe because of the additional weight od the vector pipe?
thanks
thanks
The following users liked this post:
kuki (09-02-2023)
09-02-2023, 01:00 PM
#12
That hint with 160 Rxb = 180Rxb sound good.
I have checked the max rpm according datasheet and the 160 has 122000 at 158N, the 180 125000 at 175N.
If these two engines are using the same hardware it should be possible to just change the max rpm in the ECU..
is there a way to do that? (have the V10 ECU)
thank…..would change the rpm to 124000…..
09-02-2023, 01:10 PM
#13
Thread Starter
The 158N is stated..RCJi showed at Sea Level power is more, be happy 🙂
No, the rpm is only part of the power, there are other optimising steps. The P-160Rxi-B is a lot less money than the 180 Rxi-B.
Dave
No, the rpm is only part of the power, there are other optimising steps. The P-160Rxi-B is a lot less money than the 180 Rxi-B.
Dave
09-02-2023, 01:17 PM
#14
Thread Starter
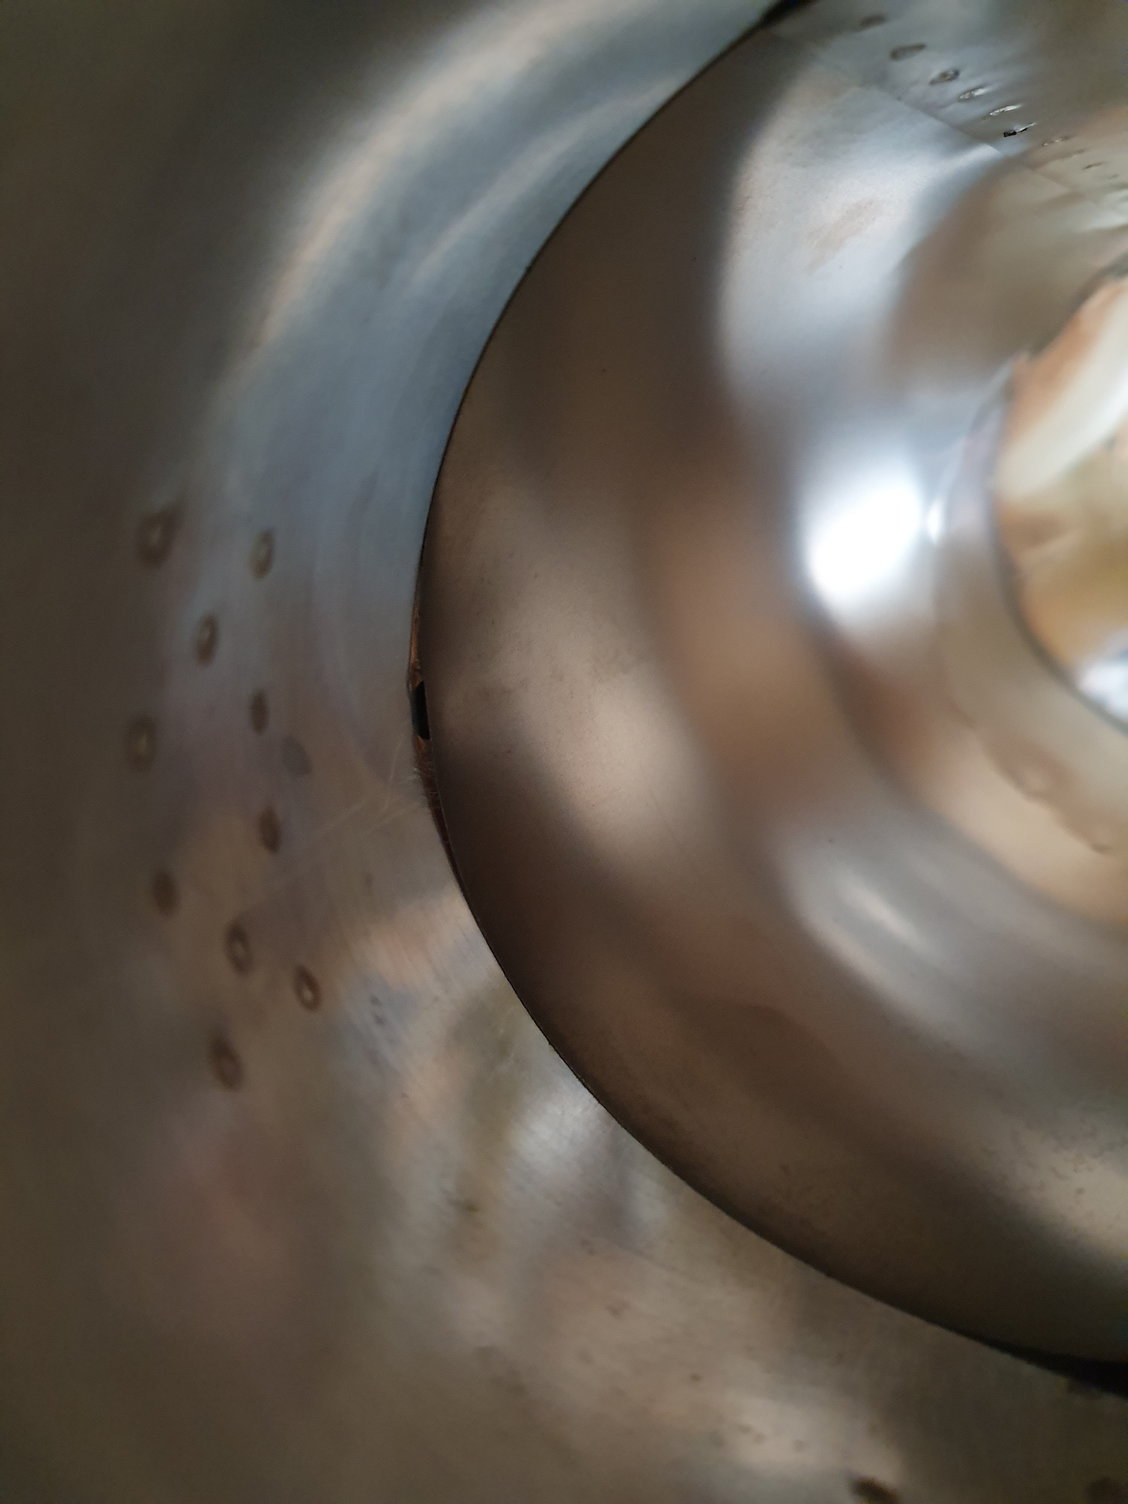
Suggestion on the pipe mounting screws was to put a 5mm length of 4mm fuel pipe onto the thread and drill out the carbon bell mouth hole to 4.1mm. Doing the nut up compresses the tube, which provides an element of flex in the pipe mount.
I used a combined drill and tap bit to make the turbine mounting holes.

I used a combined drill and tap bit to make the turbine mounting holes.
09-03-2023, 10:29 AM
#15
Thread Starter
Fantastic day with the Diablo., had seven flights now and it’s fully dialled in. Super smooth, light the Mephisto the rudder is very powerful, I ended up with 65% expo!
Will measure my final movements over the next few days, but Marius’s balance at 408mm with hopper full and main tank just about empty, is perfect.
One point of note, the canopy will go on with the nose leg up or down. 👍

Will measure my final movements over the next few days, but Marius’s balance at 408mm with hopper full and main tank just about empty, is perfect.
One point of note, the canopy will go on with the nose leg up or down. 👍
09-03-2023, 09:08 PM
#17
Thread Starter
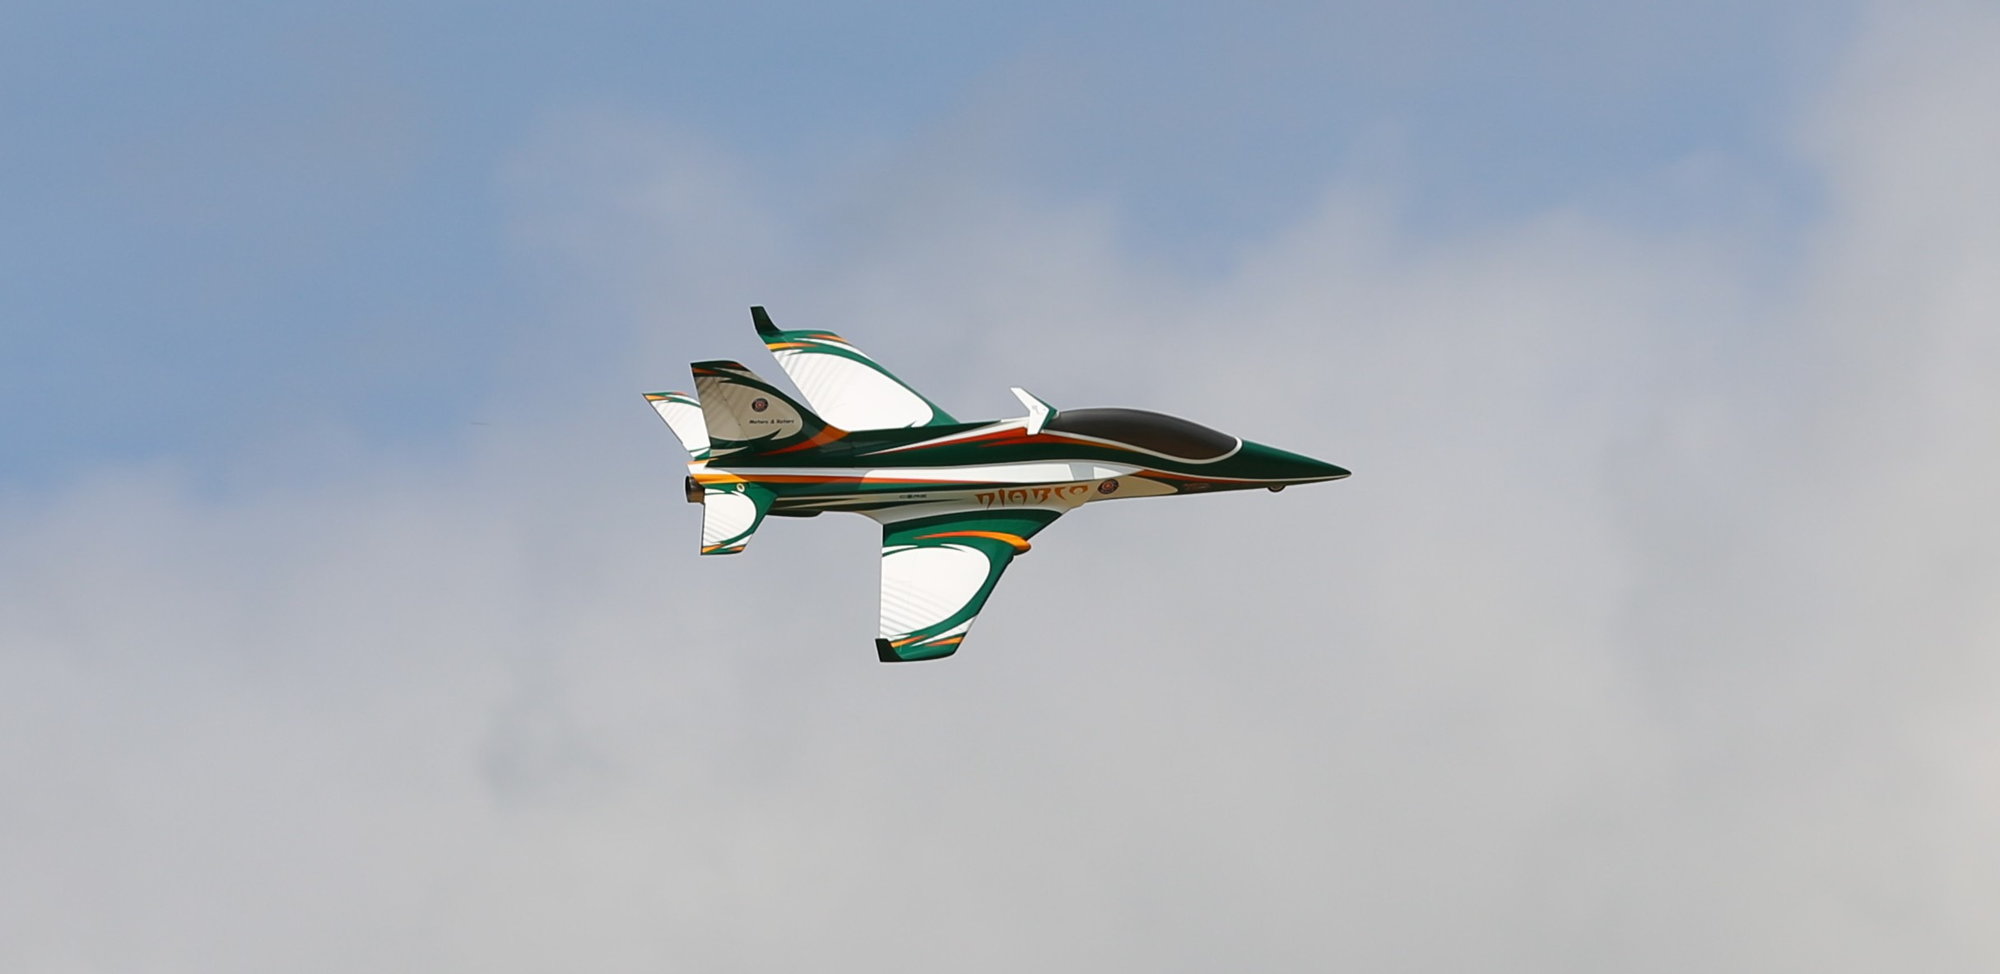
It shares a lot in common with the Mephisto, knife edge is a breeze, no coupling. I would say it rolls sharper than my Mephisto, which I kinda expected being smaller in span, but it’s really crisp and sharp. Slow speed flight is really stable, I have been playing with CROW, I have a feeling I will reduce what I have now a mm or so, but it still floats onto the ground, even in the light winds we had this weekend.
I have only hovered it at a safe height, but it’s super stable, and various methods of exiting the hover showed none of the Mephisto’s sometimes odd characteristics as it transited to wing flight.
It’s going to be a massive hit with pilots of all skill levels, but for 3-D I already feel it’s going to be everybody’s favourite!
Will post more pictures this week, it’s been a little rushed as a thread!
13.4kg with hopper full and a little residue fuel in the main tank. This is an accurate weight, CARF were using electric balance scales which already proved inaccurate on the actual balance point. The last red airframe CARF has small mini servos on things like Rudder and ailerons and he’s under 13kg.

 09-04-2023, 10:05 AM
#19
The information concerning the light servos sounds good.
Could you give me an estimation what force is needed for the Vector and the elevator?
For all other functions (flaps, ail, rudder, wheel) i would take the Savöx Wing servo SV1254MG, they have 150Ncm and that should be absolutely enought for that application..
br
Could you give me an estimation what force is needed for the Vector and the elevator?
For all other functions (flaps, ail, rudder, wheel) i would take the Savöx Wing servo SV1254MG, they have 150Ncm and that should be absolutely enought for that application..
br
09-04-2023, 10:18 AM
#20
Thread Starter
Elevator needs a strong servo..,particularly gears as it’s a single servo per side. He used Low profile standard foot print servos, I don’t think it’s worth the few grams. Since the servo arm has to be 25mm or more, you need something that is a real 35kg+
Vector is more about speed, but 20kg is probably the number as again you are using 34-38mm arms
Aileron and rudder 15kg.
I use 55kg Elevator and Flap, 28kg Aileron and Vector, I ended up with a 30kg on rudder as I had a MacGregor servo spare. Nose steering 20kg.
if you go light on torque the servo works harder…at some point it will give up and you will probably crash…
The following users liked this post:
kuki (09-04-2023)

 09-05-2023, 12:18 AM
#22
Thread Starter
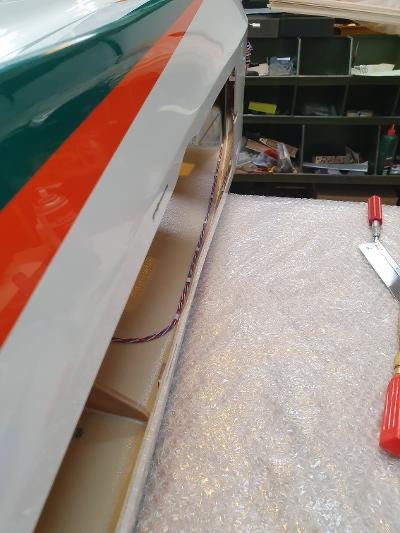
The canopy retaining screw needs to be stored somewhere before flight, at U.K. meetings we can queue to fly for a while, because the M4 screw is quite short I kept losing them!
So I have CA’d a magnet under the cannaliser mini wing and I just pop the screw on that when the top is not fixed down.


So I have CA’d a magnet under the cannaliser mini wing and I just pop the screw on that when the top is not fixed down.
 09-05-2023, 02:49 PM
#24
Thread Starter
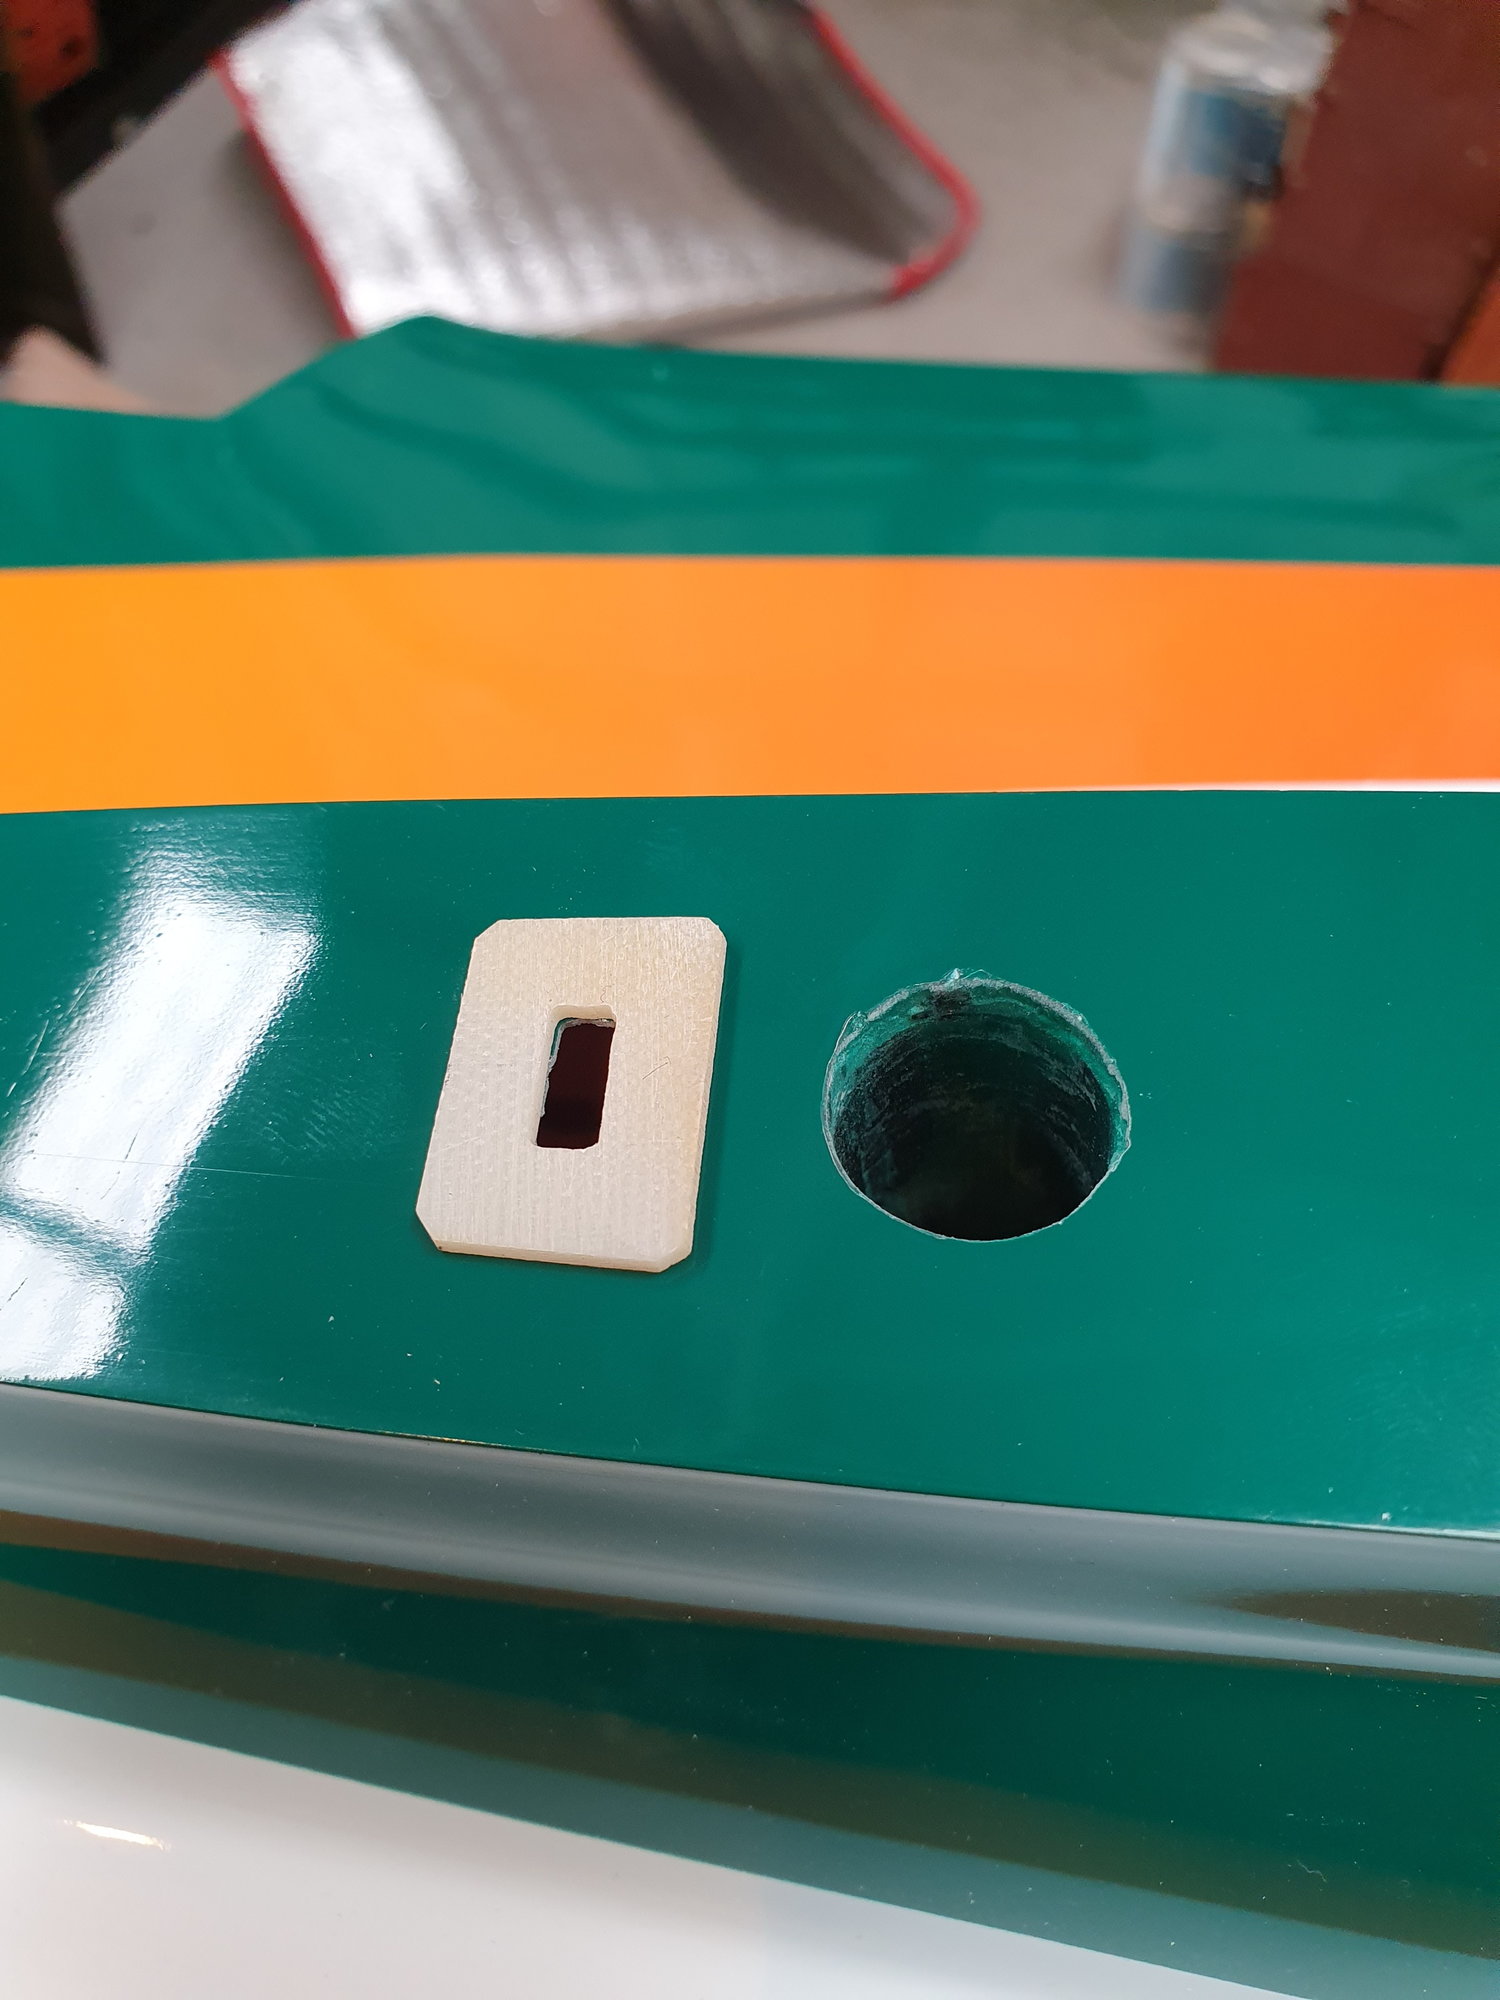
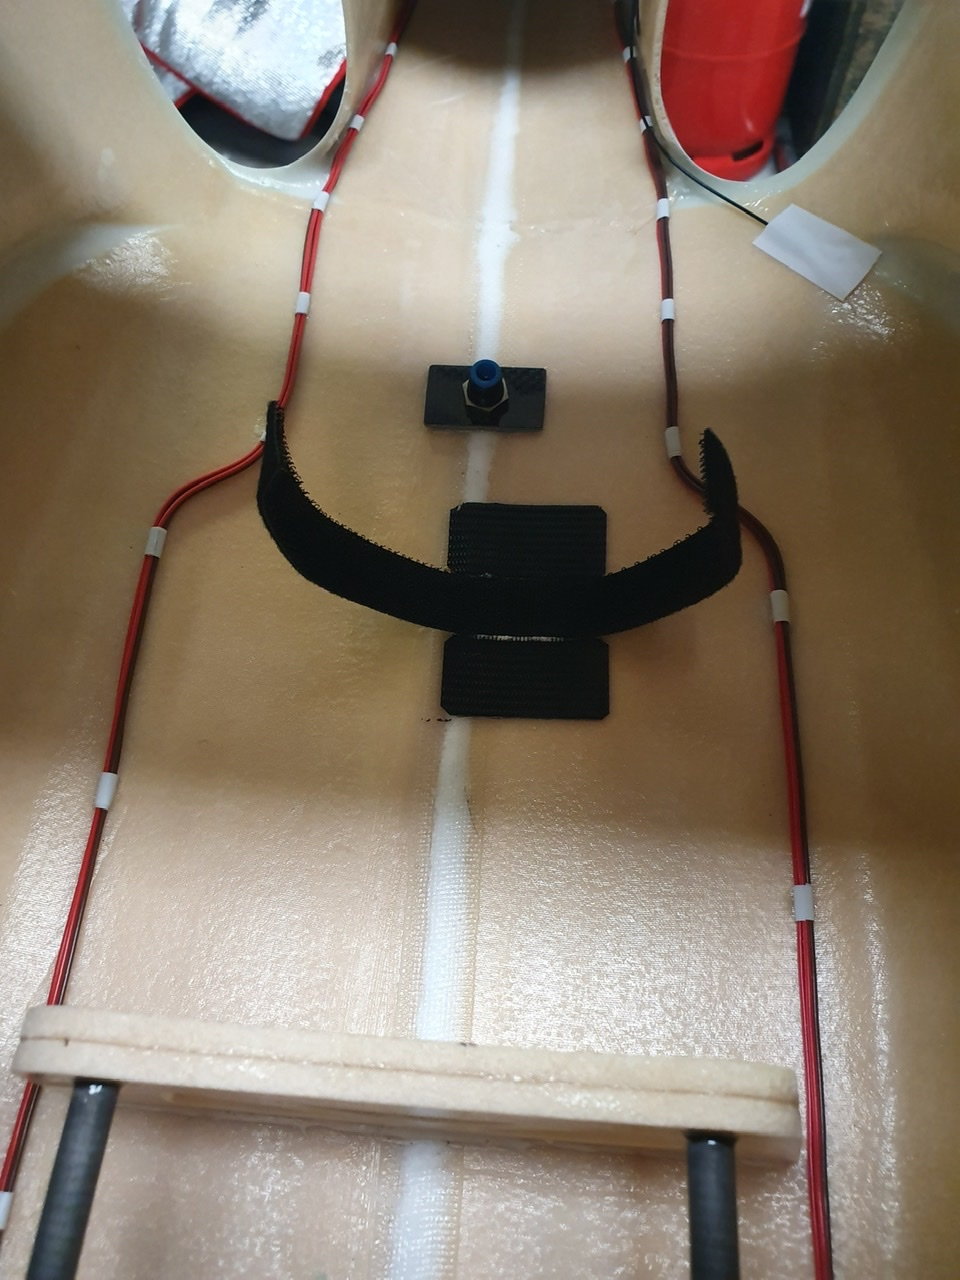
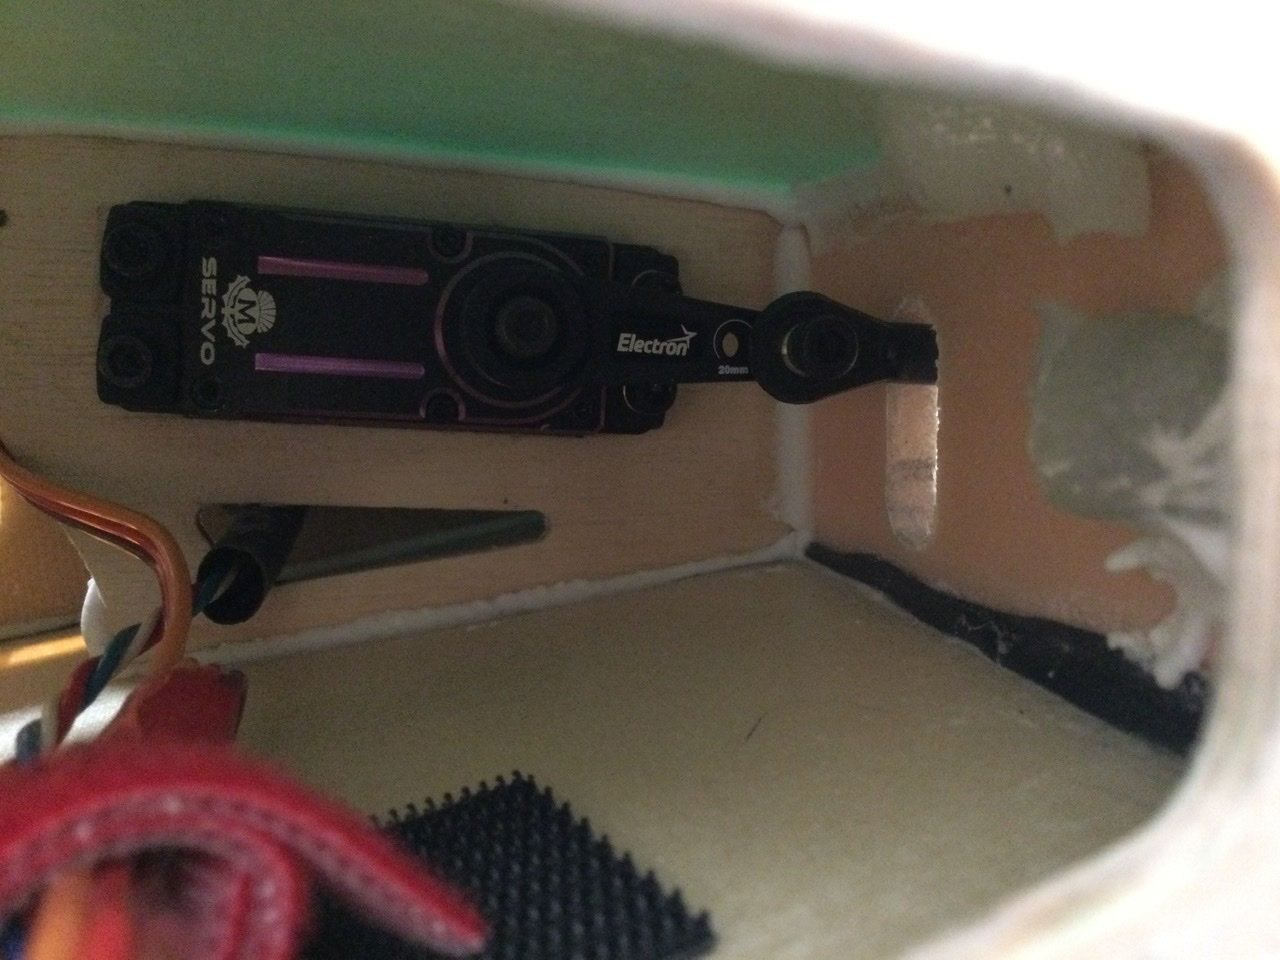
Because of the battery frame mounted in the nose, the canopy needs this green area trimming away for the canopy to slide back fully. Initially mine hit and the canopy would not fully close.
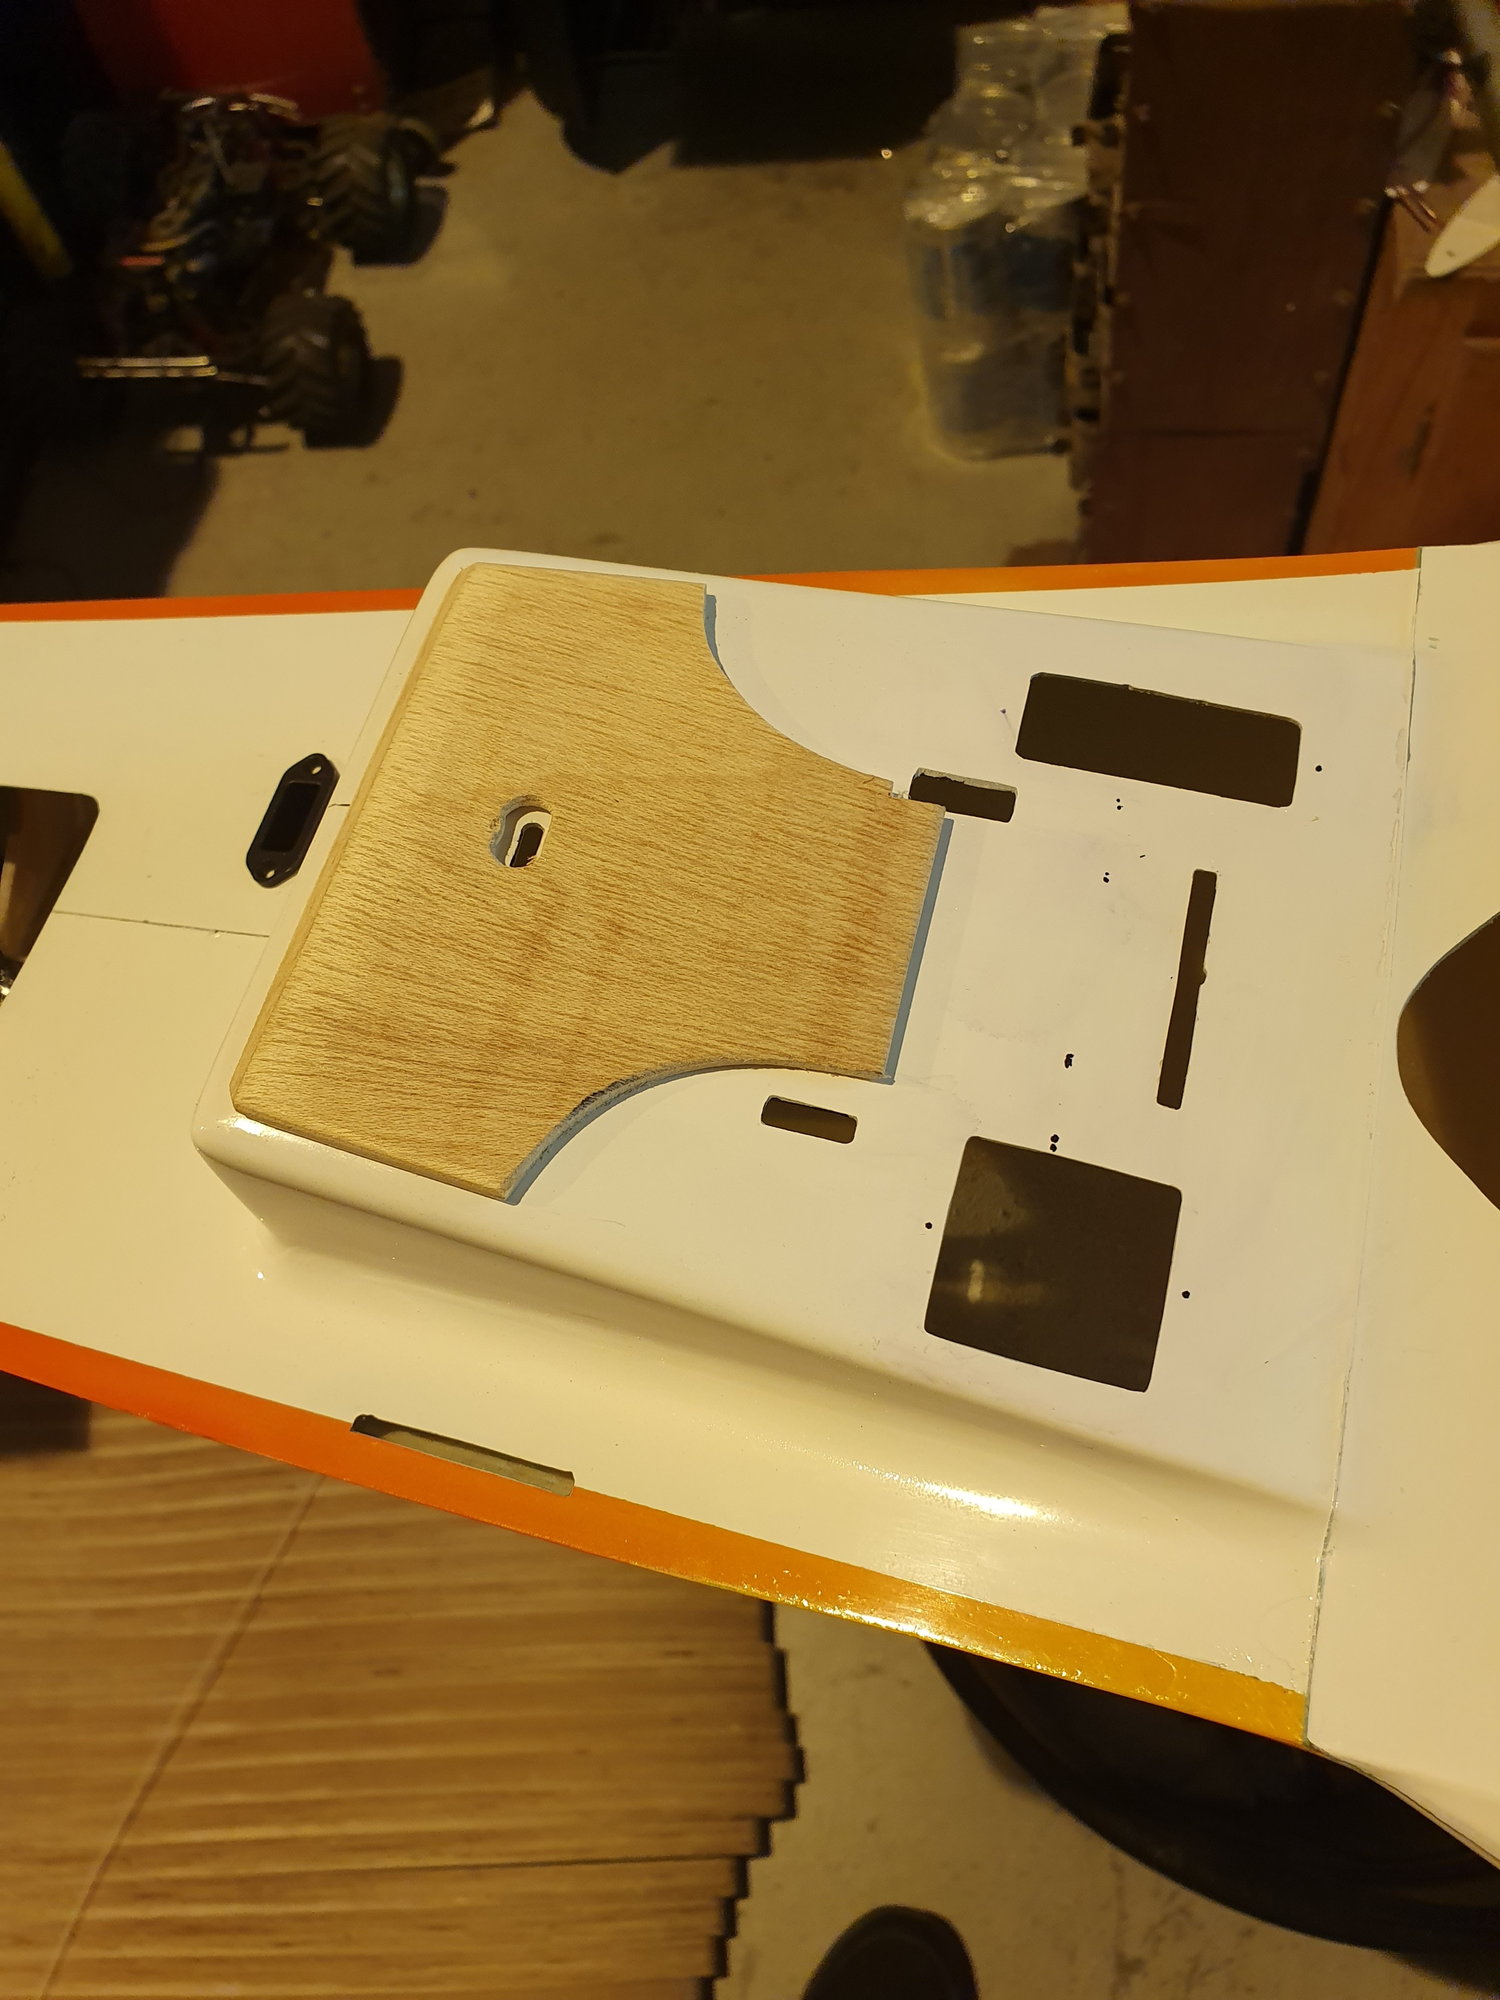
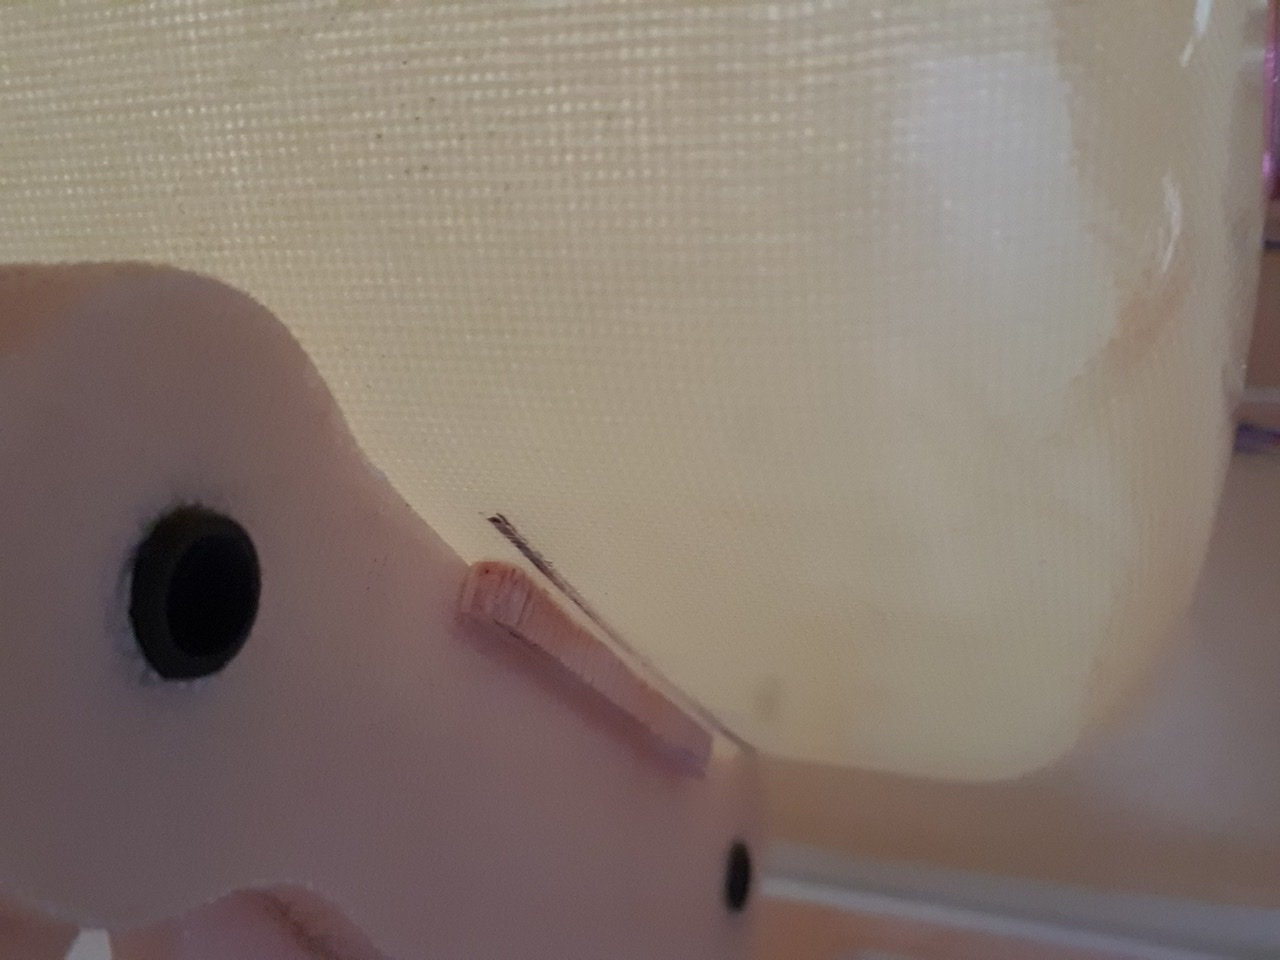
The fuel tank needs something to stop it sliding back and forth on the mounting cradle. I fitted these plywood pieces…but they need to be a little deeper than this. My tank jumped over them when I started vectoring.
I have now glued a strip of Velcro to the tank and frame surface.
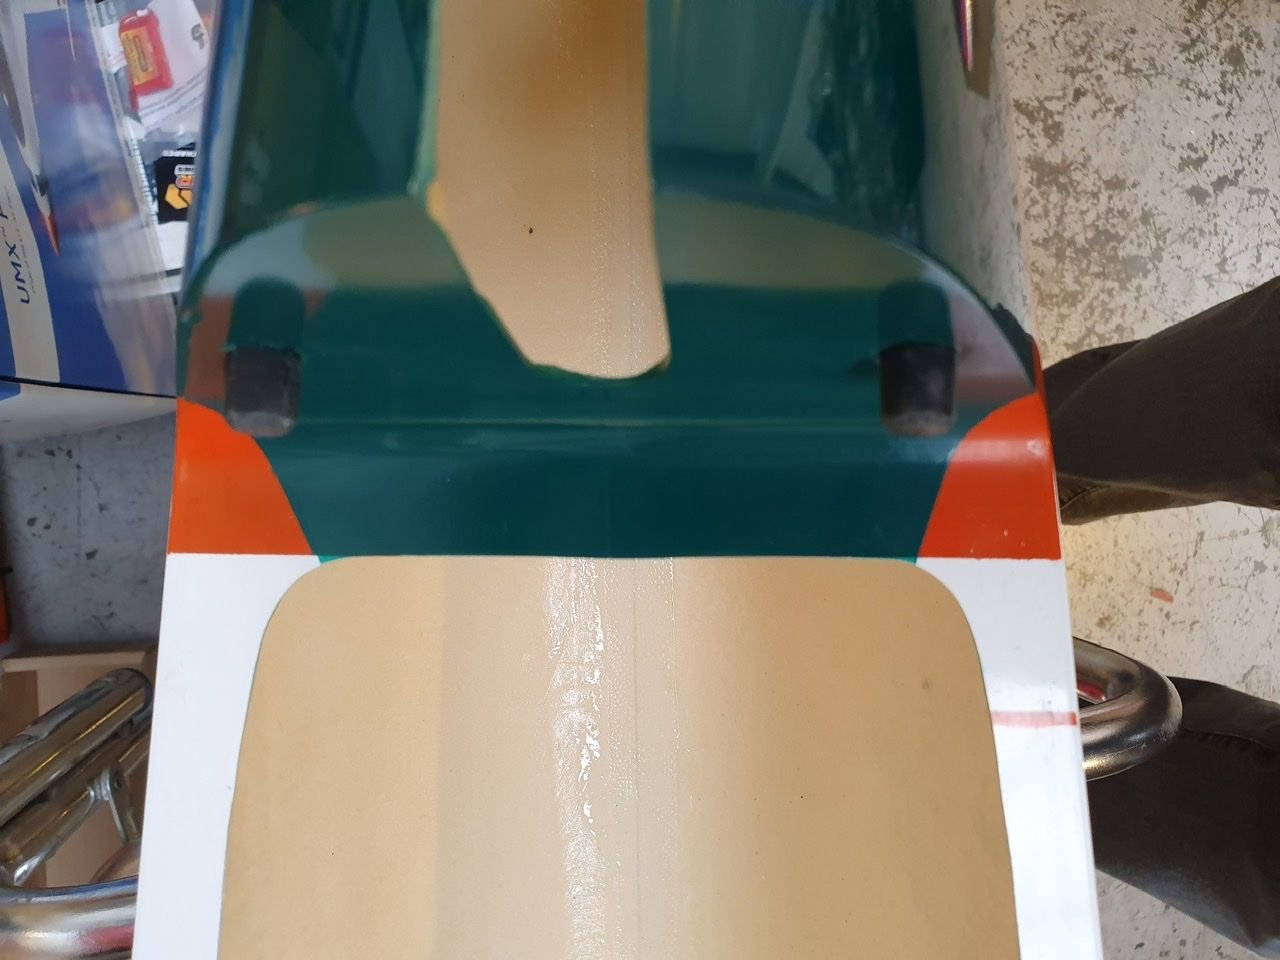
The green area needs cutting back
The fuel tank needs something to stop it sliding back and forth on the mounting cradle. I fitted these plywood pieces…but they need to be a little deeper than this. My tank jumped over them when I started vectoring.
I have now glued a strip of Velcro to the tank and frame surface.
The green area needs cutting back